
How to Make a Dried Rose Shadow Box Frame With Fairy Lights
A dried rose shadow box frame is a beautiful handmade gift idea that looks romantic, personal, and expensive, but the process is actually simple when you build it step by step.
The viral version of this craft uses dried red roses, a white deep display frame, a soft ribbon bow, and warm fairy lights. The final result looks like a preserved rose bouquet glowing inside a frame.
The important thing is this: you do not make a full bouquet first and then place it inside the frame. Instead, you cut and prepare the roses one by one, arrange them carefully on a flat white backing board, glue each piece in place, then add the ribbon, lights, and frame.
This makes the final design look cleaner and more professional.
What Is This Rose Frame Called?
This project is usually made with a deep frame called a shadow box frame. You can also search for:
- shadow box frame
- deep display frame
- 3D photo frame
- memory box frame
- deep box frame for flowers
The frame needs to be deep enough to hold the dried roses without crushing them against the glass. A normal flat photo frame will not work well for this project.
Materials You Need
To make this DIY dried rose frame, you will need:
- Dried roses or preserved roses
- A white shadow box frame
- White cardboard or thick backing paper
- Small warm fairy lights
- White organza ribbon
- Scissors or flower cutters
- Hot glue gun or strong craft glue
- Tweezers, optional
- Small handwritten message or printed note, optional
Warm yellow fairy lights usually look better than cold white lights because they give the frame a soft romantic glow.
Step 1: Choose and Open the Shadow Box Frame
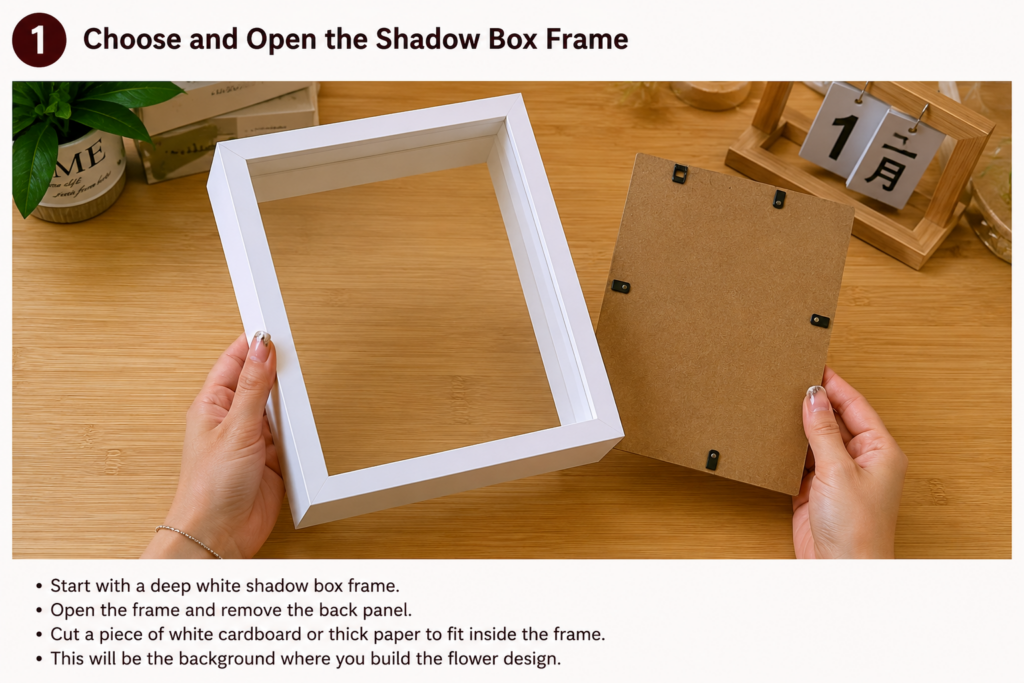
Start with a deep white shadow box frame. Open the frame and remove the back panel.
Cut a piece of white cardboard or thick paper to fit inside the frame. This will be the background where you build the flower design.
It is better to work on the backing board outside the frame first. This gives you more control when arranging and gluing the roses.
Step 2: Prepare the Dried Roses One by One
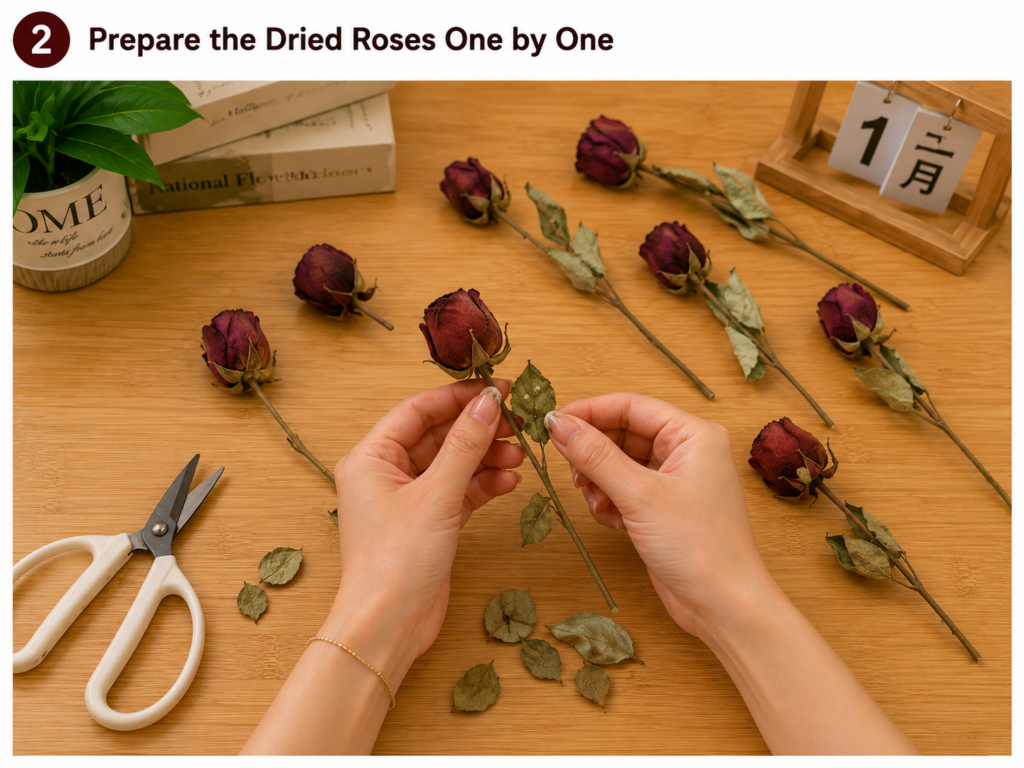
Take your dried roses and separate them carefully.
Do not keep them as one full bunch. In the original style, each rose is handled individually. Some roses are used with short stems, some with longer stems, and some leaves are kept to fill the design.
Remove broken petals and messy leaves. Keep the best-looking rose heads for the top part of the bouquet.
Be gentle because dried roses can break easily.
Step 3: Cut the Stems to Different Lengths
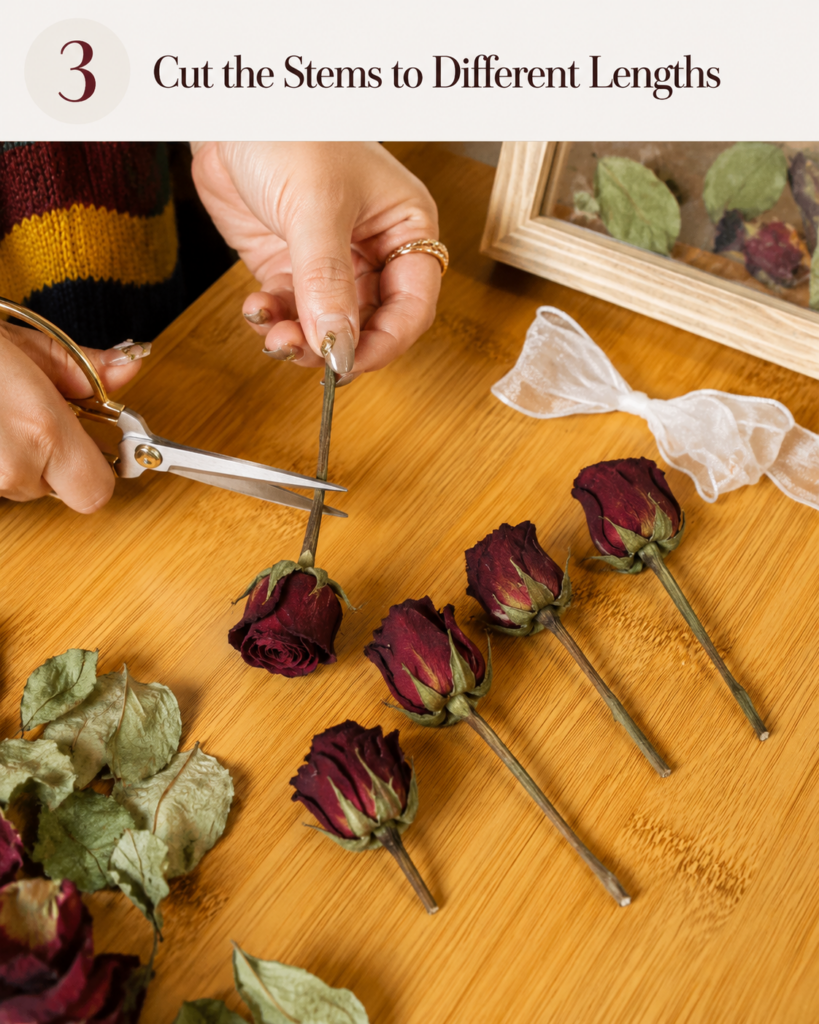
Use scissors or flower cutters to trim the stems.
Cut each rose separately. Some stems should be shorter, and some should be longer. This helps you create a natural bouquet shape later.
The roses at the top can have shorter stems, while the roses near the middle and bottom can have longer stems pointing downward.
Do not cut everything the same length. A natural handmade look comes from small differences.
Step 4: Test the Rose Layout Before Gluing
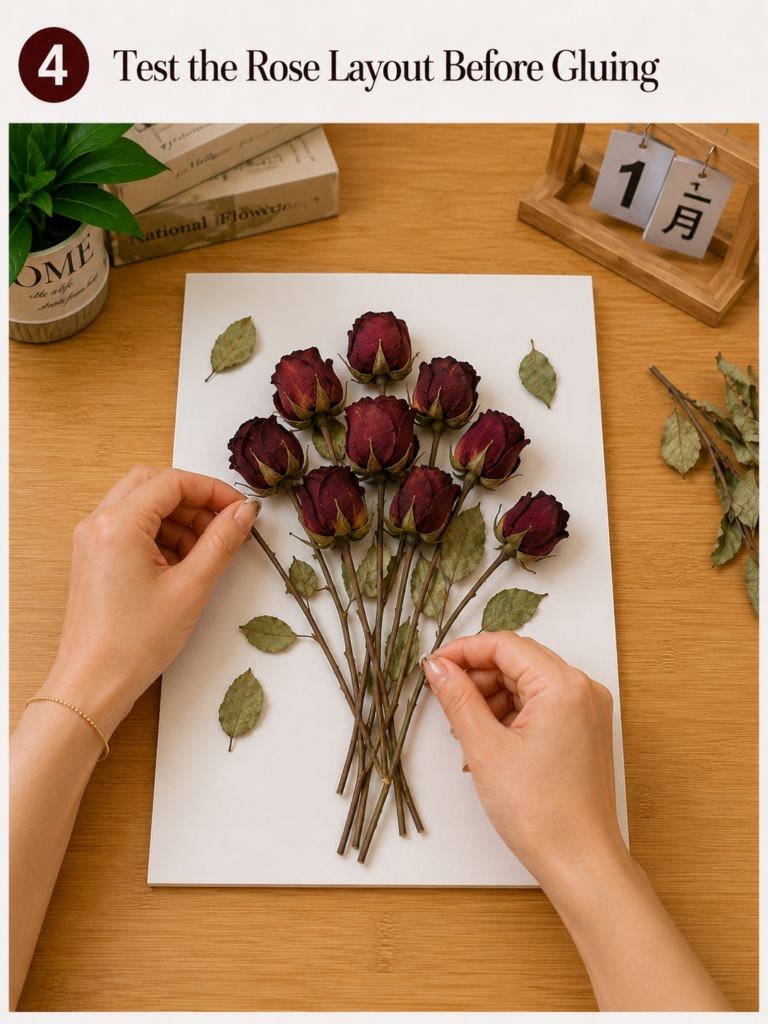
Place the white backing board flat on the table.
Start arranging the rose heads at the top of the board. Put the larger or prettier roses in the middle, then place the other roses around them to create a rounded bouquet shape.
At this stage, do not glue anything yet.
Move the roses around until the top looks full and balanced. The bouquet should be wide at the top and narrow at the bottom.
Step 5: Build the Bouquet Shape Rose by Rose
Now begin building the bouquet directly on the backing board.
Place one rose, then another, then another. The idea is to create the illusion of a bouquet, but the bouquet is actually being built flat on the board.
Overlap the rose heads slightly so there are no big empty gaps. Keep the flower heads close together at the top.
This is the step that makes the craft look like the viral pin. The roses should look arranged, not simply placed randomly.
Step 6: Add the Stems Under the Roses
After the flower heads are arranged, place the stems downward so they look like a real bouquet.
The stems should meet near the lower center of the design. Some stems can cross each other naturally.
You can use the real stems from the roses or cut extra stems and glue them separately. The goal is to make the viewer feel like the roses are tied together, even though everything is glued flat to the backing board.
Step 7: Add Leaves to Fill the Empty Spaces
Use dried leaves to make the bouquet look fuller.
Place a few leaves behind the rose heads and between the stems. Do not use too many leaves. The roses should stay the main focus.
Leaves are useful for hiding small gaps, glue marks, or empty areas between the flowers.
Step 8: Glue Everything Carefully
Once the layout looks good, start gluing the pieces in place.
Lift one rose at a time, add a small amount of hot glue to the back, then press it gently onto the white backing board.
Do the same with the stems and leaves.
Use only enough glue to hold the pieces. Too much glue can look messy and may show through the design.
Work slowly. It is better to glue piece by piece than to rush and lose the shape.
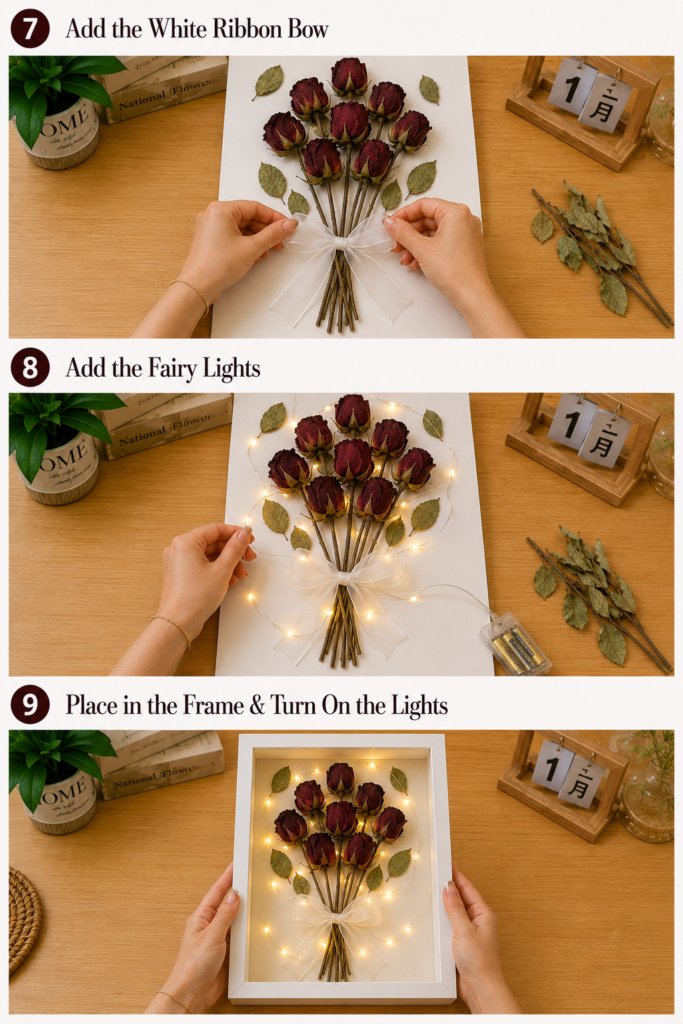
Step 9: Add a White Ribbon Bow
Tie a soft white or cream ribbon into a bow.
Place the bow where the stems meet, near the lower center of the bouquet. This makes the flat flower design look like a real wrapped bouquet.
Glue the bow carefully in place.
An organza ribbon works very well because it looks light, soft, and romantic.
Step 10: Add Fairy Lights Around the Roses
Use small warm battery-powered fairy lights.
Place the lights around the roses and between some flowers. Try to hide the thin wire behind the roses, leaves, and stems.
Do not cover the flowers too much with lights. The lights should highlight the bouquet, not take over the whole design.
Keep the battery pack hidden behind the backing board or at the side of the frame, but make sure you can still turn it on and off.
Step 11: Add a Small Message or Date
You can write a small message on the lower corner of the backing board.
Keep it simple and elegant. Good ideas include:
Forever yours
Made with love
Our special day
Happy anniversary
A name and date
A short romantic quote
Do not write too large. The message should feel like a small personal detail, not the main decoration.
Step 12: Place the Finished Board Inside the Frame
After the flowers, ribbon, lights, and message are secure, carefully place the finished backing board inside the shadow box frame.
Check that the roses have enough space and are not being crushed by the glass.
Make sure the fairy light battery pack is hidden neatly and still accessible.
Step 13: Close the Frame and Turn On the Lights
Close the frame carefully.
Turn on the fairy lights and check the final look. The warm lights should glow softly around the dried roses.
Now the dried rose shadow box frame is finished and ready to display or give as a gift.
Best Occasions for This DIY Rose Frame
This handmade rose frame is perfect for:
- Valentine’s Day
- Anniversaries
- Birthdays
- Mother’s Day
- Wedding gifts
- Graduation gifts
- Romantic room decor
- Memory gifts using real flowers
- Handmade shop products
It is also a great craft idea if you want to turn old roses into a keepsake instead of throwing them away.
Tips to Make It Look Like the Viral Pin
Use dark red dried roses for a romantic look.
Use a clean white deep frame.
Work on a white backing board before placing it inside the frame.
Build the bouquet rose by rose, not as one full bunch.
Keep the rose heads close together at the top.
Let the stems meet naturally at the bottom.
Use a soft white ribbon bow.
Hide the fairy light wires as much as possible.
Add only a small message or date.
Keep the whole design clean and simple.
Common Mistakes to Avoid
Do not use a flat photo frame. The roses need depth.
Do not glue a full bouquet directly into the frame. It can look bulky and messy.
Do not use fresh roses unless they are dried first. Fresh flowers can rot or create moisture inside the frame.
Do not add too many decorations. The beauty of this design comes from the roses, ribbon, and warm lights.
Do not forget to test the layout before gluing. Once dried flowers are glued, they can break if you try to remove them.
Can You Use Artificial Roses?
Yes, artificial roses can work, especially if you want the frame to last longer and avoid broken petals.
However, dried roses give a more emotional and handmade look. If the frame is for a romantic gift or memory keepsake, dried or preserved roses usually look better.
Can You Use Real Roses From a Bouquet?
Yes, but you must dry them first.
Hang the roses upside down in a dry place for one to two weeks until they are fully dried. Once dry, you can cut and arrange them inside the frame.
This is a beautiful idea if the roses came from a wedding, anniversary, first date, birthday, or another special moment.
Final Thoughts
A dried rose shadow box frame is a simple but beautiful craft project. The secret is to build the design slowly, one rose at a time.
Instead of making a full bouquet and forcing it into the frame, arrange each rose, stem, and leaf directly on the white backing board. This gives you more control and creates a cleaner final result.
With dried roses, a deep white frame, a ribbon bow, and warm fairy lights, you can create a romantic handmade keepsake that looks perfect as a gift or room decoration.
FAQ
What frame do I need for this project?
You need a deep shadow box frame, also called a 3D photo frame, memory box frame, or deep display frame.
Can I use a normal photo frame?
No. A normal photo frame is too flat and will crush the flowers.
Do I make the bouquet first?
No. For the clean viral style, cut and arrange each rose separately on the backing board, then glue them one by one.
What kind of lights should I use?
Use small warm battery-powered fairy lights. Warm yellow lights look softer and more romantic.
Can I sell this handmade rose frame?
Yes, this can be a good handmade product idea. Just use your own photos and videos when promoting it online.
How long does this project take?
It usually takes 30 to 60 minutes, depending on how carefully you arrange the roses.
What is the best color for the frame?
White is the best choice for a clean romantic look, but wood, gold, or black can also work depending on the style you want.