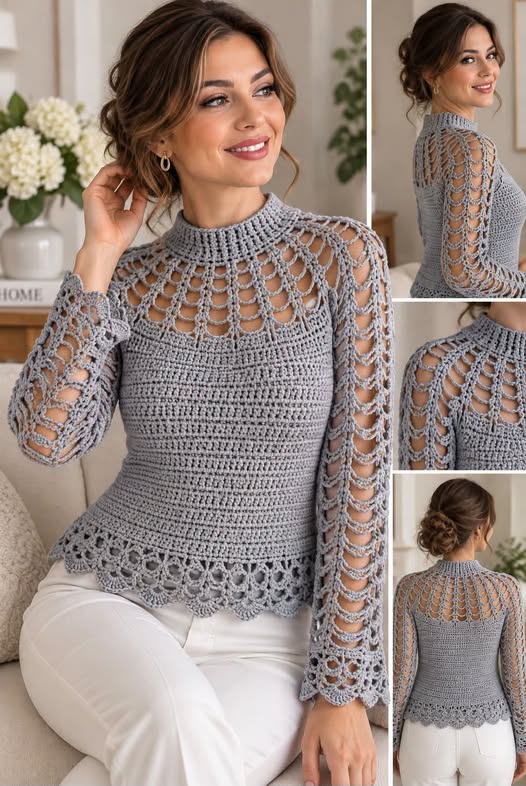
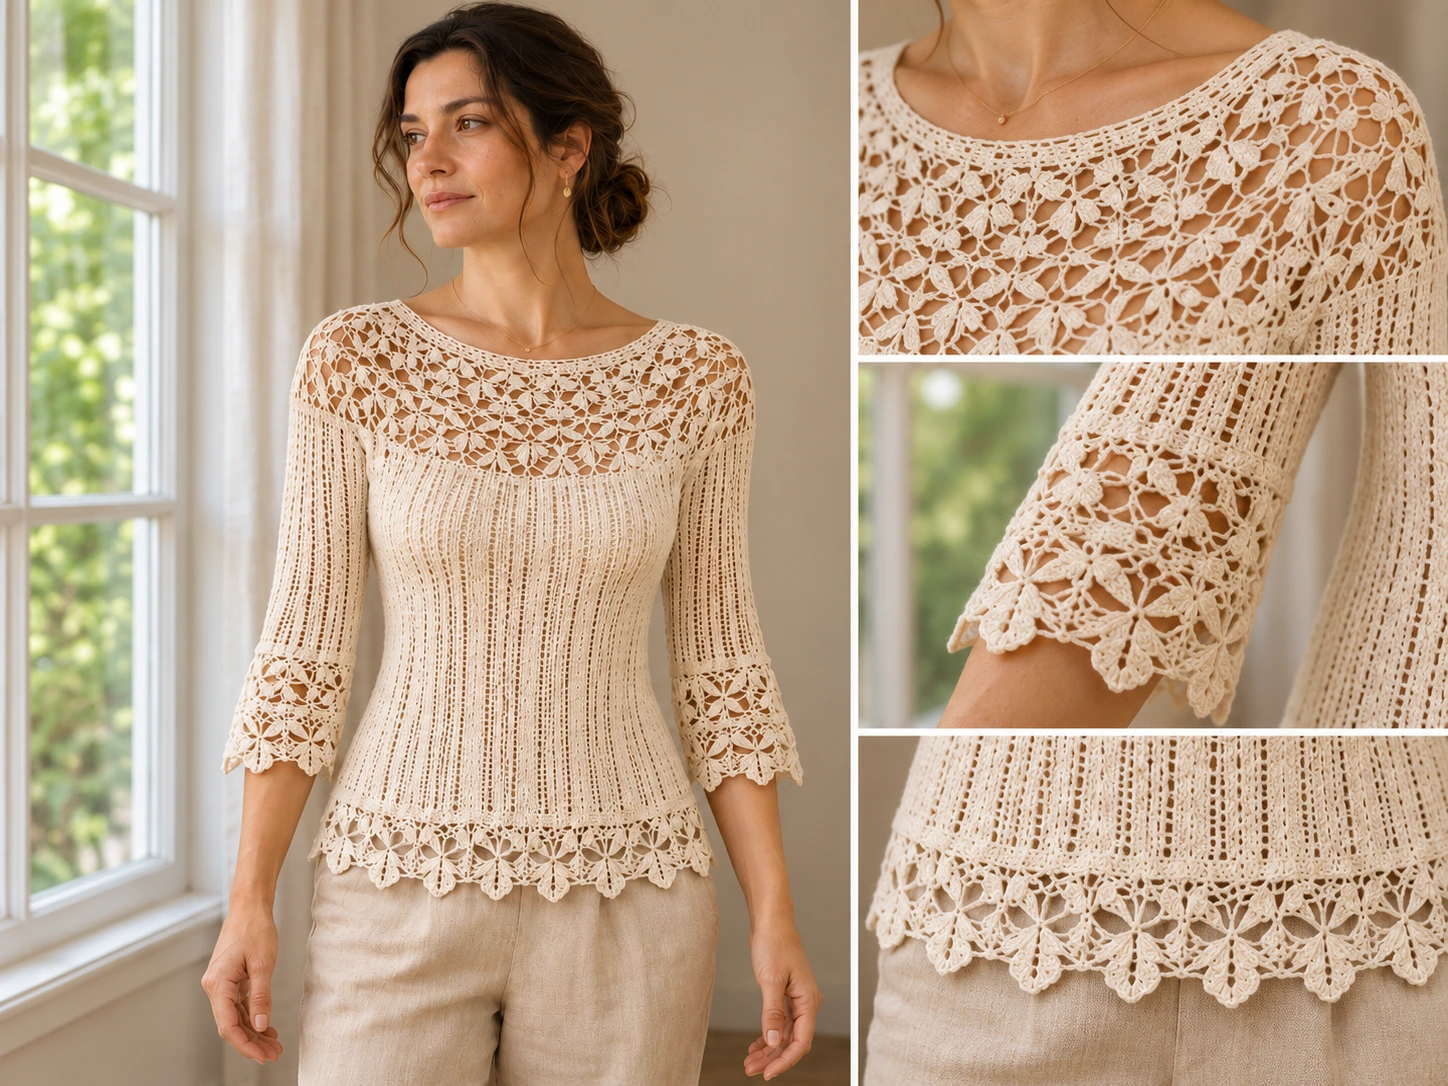
Magnolia Vine Crochet Lace Top Pattern: Step-by-Step Tutorial with Pictures
PATTERN FORMAT US crochet terms • Sizes XS-2XL • Intermediate-Advanced Intermediate • Fine Category 2 / sport-weight yarn
Digital crochet pattern. Written instructions and stitch counts are the authoritative source.
How to Use This Pattern
IMPORTANT The visual pages are teaching aids. If any text embedded in an illustration differs from the written instructions in this document, follow the written instructions and stitch counts in this document.
• Read the entire pattern once before beginning. • Choose size from finished bust measurements, not retail clothing size. • Make and block a gauge swatch before starting. • Use stitch markers at the beginning of round and at all four shaping points. • Count ch-1 openings as stitch positions when the pattern says to count stitch positions. • Check the visual milestone at the end of each major step before moving on.
Construction at a Glance
1. Make a blocked gauge swatch and prepare materials.
2. Crochet the seamless lower body in joined rounds.
3. Shape the waist with four evenly distributed shaping points.
4. Divide the body into front and back yoke panels.
5. Shape the front neckline and shoulders.
6. Work the back yoke and join shoulders.
7. Crochet magnolia flowers and leaves.
8. Attach motifs in staggered yoke bands.
9. Pick up and crochet both sleeves; add decorative cuffs.
10. Add hem and neckline edging, weave ends, and block.
Pattern Information
| Size | Finished Bust | Recommended Body Bust |
|---|---|---|
| XS | 34.7 in / 88 cm | 32-34 in |
| S | 38.7 in / 98 cm | 36-38 in |
| M | 42.7 in / 108 cm | 40-42 in |
| L | 46.7 in / 119 cm | 44-46 in |
| XL | 50.7 in / 129 cm | 48-50 in |
| 2XL | 54.7 in / 138 cm | 52-54 in |
Approximate finished length: 21-23 in / 53-58 cm, depending on size and blocking.
Materials
• Fine Category 2 / sport-weight smooth cotton, cotton-bamboo, or similar yarn. • 3.25 mm main crochet hook. • 3.0 mm motif and border hook. • 2.75-3.0 mm neckline hook. • Tapestry needle, removable stitch markers, measuring tape, blocking mats, rustproof pins.
| Size | Approx. Yardage |
|---|---|
| XS | 1,050 yd |
| S | 1,150 yd |
| M | 1,300 yd |
| L | 1,450 yd |
| XL | 1,600 yd |
| 2XL | 1,800 yd |
Gauge
24 stitch positions x 12 rows/rounds = 4 in / 10 cm after washing and blocking a Vertical Rib Lace swatch.
GAUGE RULE A ch-1 opening that forms part of the established VRL or Yoke Mesh fabric counts as one stitch position.
Abbreviations
| Abbreviation | Meaning |
|---|---|
| ch | chain |
| sc | single crochet |
| hdc | half double crochet |
| dc | double crochet |
| tr | treble crochet |
| sl st | slip stitch |
| st(s) | stitch(es) |
| sk | skip |
| dc2tog | double crochet 2 together |
| dc3tog | double crochet 3 together |
| RS / WS | right side / wrong side |
| BOR | beginning of round |
| rep | repeat |
| sp | space |
Special Stitch Patterns
Vertical Rib Lace (VRL)
Multiple of 4. Standard joined round: Ch 3 (counts as first dc), dc in next 2 stitch positions, ch 1, sk next stitch position; *dc in next 3 stitch positions, ch 1, sk next stitch position*; repeat around. Join to top of beginning ch-3. Do not turn.
SHAPING NOTE When decreasing or increasing, work in solid dc portions whenever possible. Do not place a shaping operation directly over a ch-1 opening unless required to maintain the stated round count.
Yoke Mesh (YM)
Worked over an even number of stitch positions. Ch 3 (counts as first dc), *ch 1, sk next stitch position, dc in next stitch position*; repeat until one stitch position remains, dc in final stitch position. Turn. Each dc and ch-1 opening counts as one stitch position.
Joined-Round Convention
• Join each round with a slip stitch unless stated otherwise. • Do not turn joined rounds. • Beginning chains count only where specifically stated. • Keep BOR aligned consistently.
Step 1 – Materials, Gauge & Finished Goal
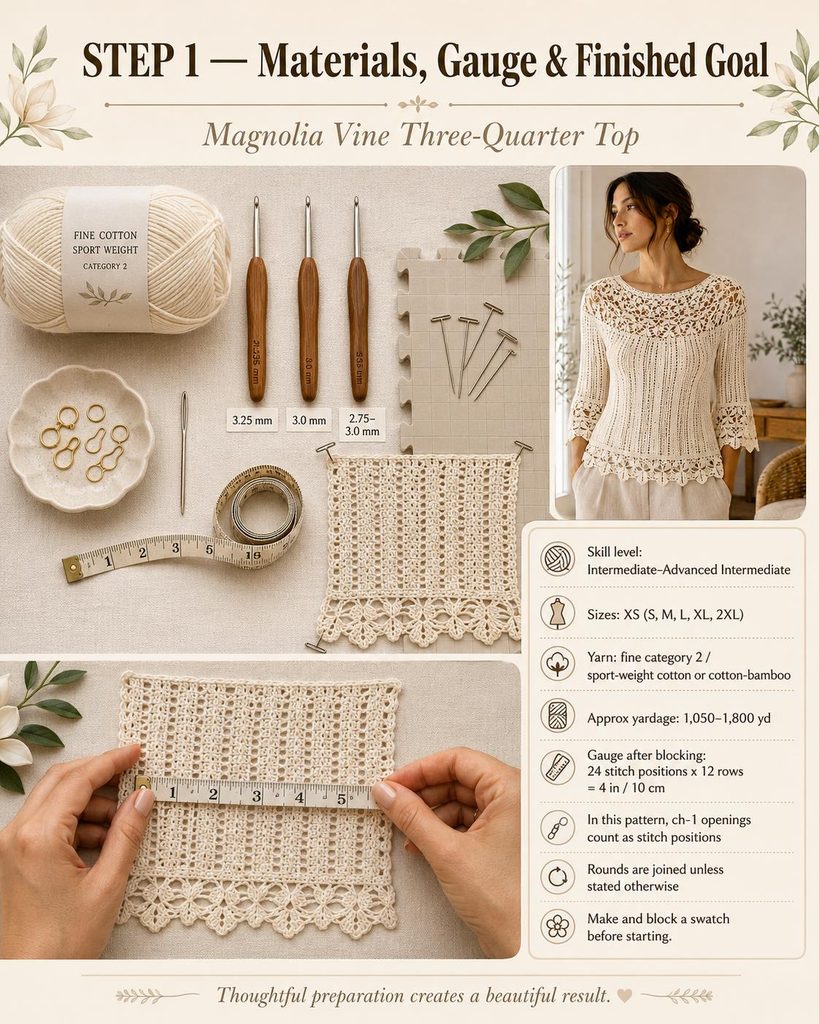
Visual guide – materials, gauge, and the intended finished appearance.
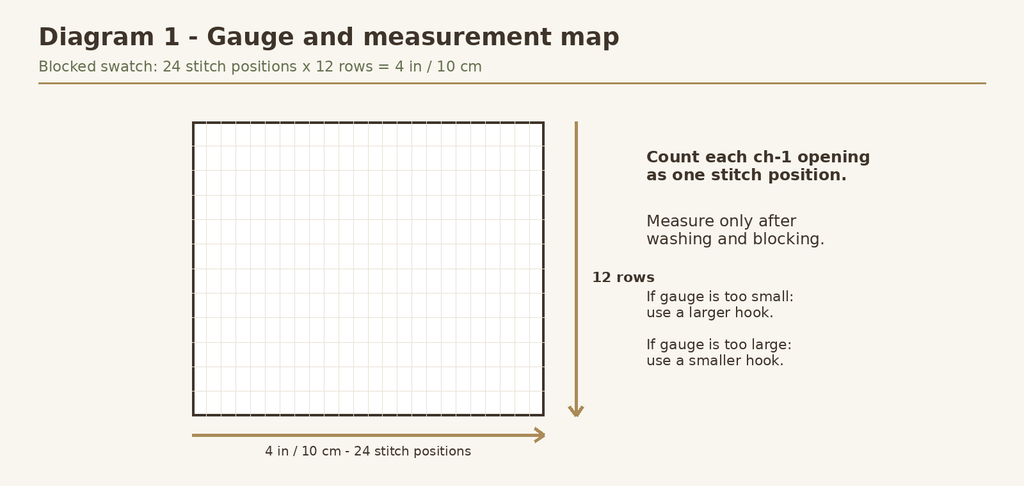
Diagram guidance – count 24 stitch positions across and 12 rows vertically inside a blocked 4 in / 10 cm square.
1. Gather the listed yarn, hooks, markers, tapestry needle, measuring tape and blocking supplies.
2. Crochet a VRL swatch larger than 4 in / 10 cm square.
3. Wash and block the swatch exactly as you intend to care for the finished garment.
4. Measure a central 4 in / 10 cm area. Confirm 24 stitch positions and 12 rows/rounds.
5. Adjust hook size if needed and re-swatch before beginning the garment.
VISUAL CHECK The swatch should be soft and flexible with straight vertical eyelet columns, not stiff or overly open.
Step 2 – Foundation Chain & Setup Round
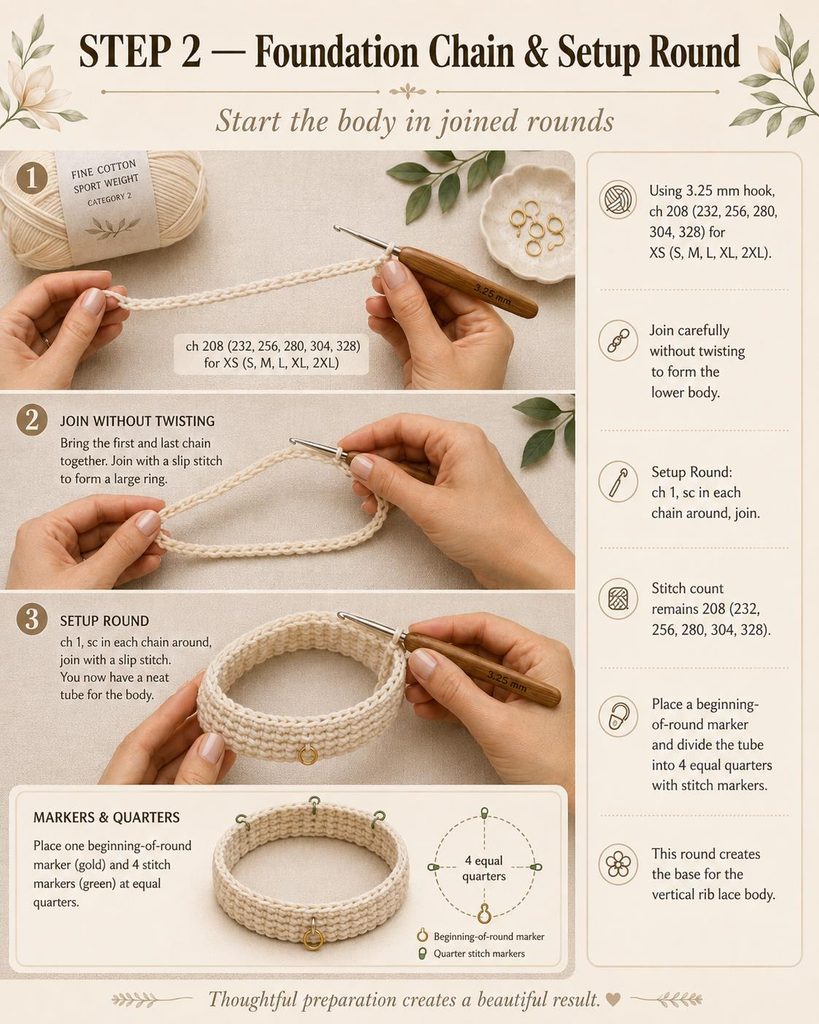
Visual guide – make the long foundation chain, join without twisting, and place markers.
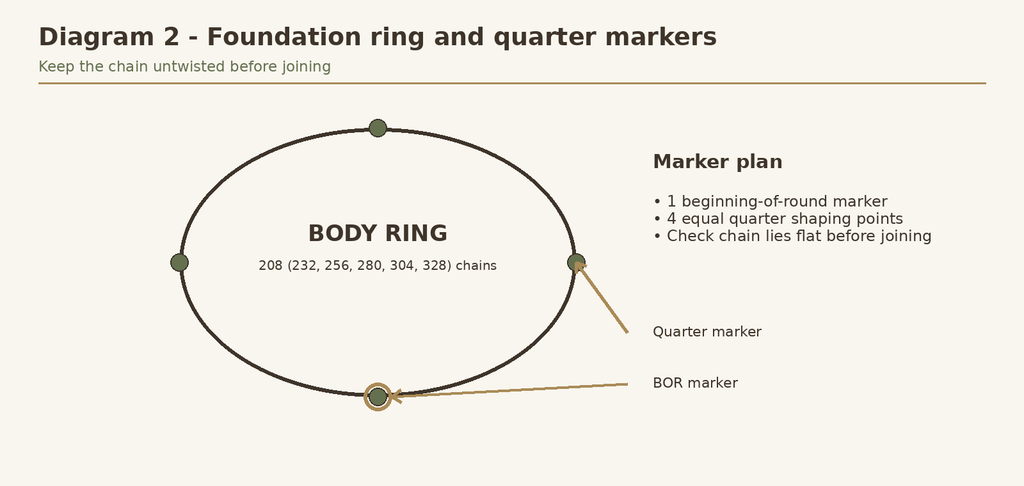
Diagram guidance – the foundation ring must lie flat. Place four quarter markers evenly around the circumference and a BOR marker at the join.
1. Using 3.25 mm hook, ch 208 (232, 256, 280, 304, 328).
2. Lay the chain flat and trace it around once with your fingers to confirm there is no twist. Join with sl st to first chain.
3. Setup Round: ch 1, sc in each chain around; join. Stitch count: 208 (232, 256, 280, 304, 328) sc.
4. Place BOR marker. Divide the round into four equal quarters and place shaping markers at the quarter points.
COUNT CHECK The setup-round count must exactly match the foundation-chain count before you continue.
Step 3 – Crochet the Body & Shape the Waist
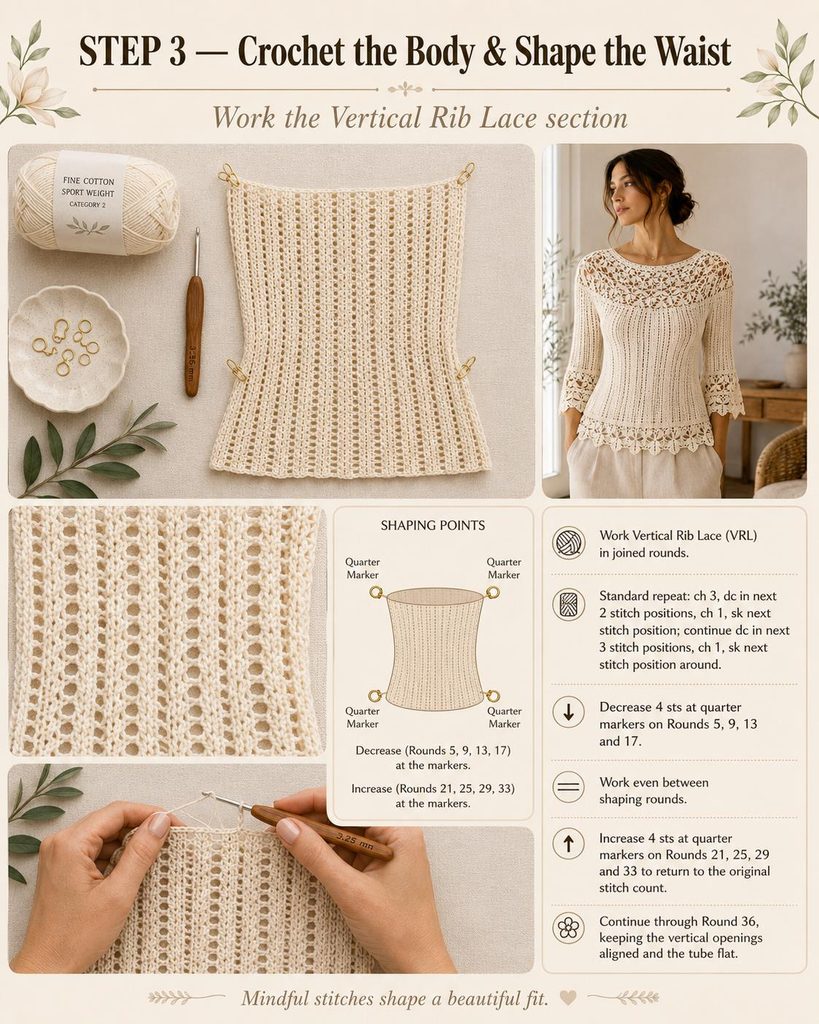
Visual guide – Vertical Rib Lace body and gradual waist shaping.
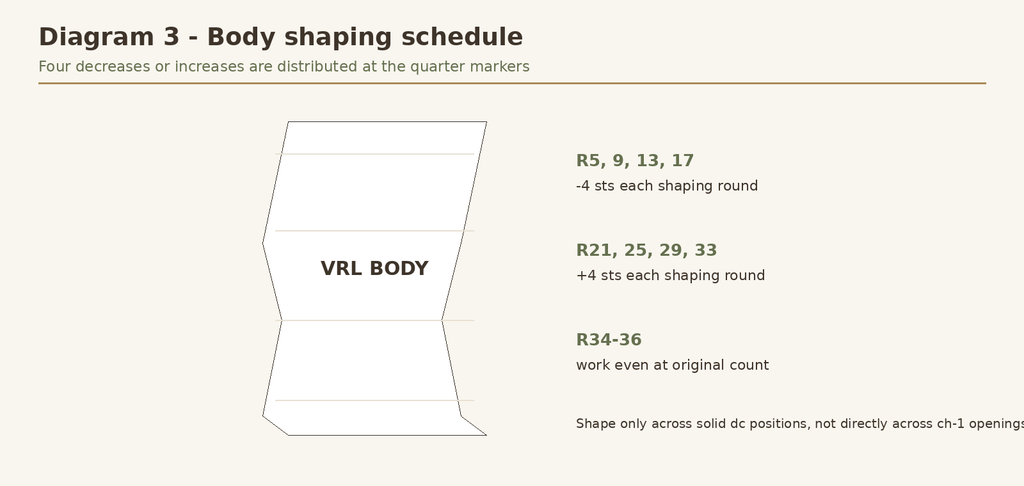
Diagram guidance – decreases occur on Rounds 5, 9, 13, 17; increases occur on Rounds 21, 25, 29, 33.
| Round(s) | XS | S | M | L | XL | 2XL |
|---|---|---|---|---|---|---|
| 1-4 | 208 | 232 | 256 | 280 | 304 | 328 |
| 5 | 204 | 228 | 252 | 276 | 300 | 324 |
| 6-8 | 204 | 228 | 252 | 276 | 300 | 324 |
| 9 | 200 | 224 | 248 | 272 | 296 | 320 |
| 10-12 | 200 | 224 | 248 | 272 | 296 | 320 |
| 13 | 196 | 220 | 244 | 268 | 292 | 316 |
| 14-16 | 196 | 220 | 244 | 268 | 292 | 316 |
| 17 | 192 | 216 | 240 | 264 | 288 | 312 |
| 18-20 | 192 | 216 | 240 | 264 | 288 | 312 |
| 21 | 196 | 220 | 244 | 268 | 292 | 316 |
| 22-24 | 196 | 220 | 244 | 268 | 292 | 316 |
| 25 | 200 | 224 | 248 | 272 | 296 | 320 |
| 26-28 | 200 | 224 | 248 | 272 | 296 | 320 |
| 29 | 204 | 228 | 252 | 276 | 300 | 324 |
| 30-32 | 204 | 228 | 252 | 276 | 300 | 324 |
| 33-36 | 208 | 232 | 256 | 280 | 304 | 328 |
Decrease rounds: At each of the four quarter markers, decrease one stitch across adjacent dc positions. Four decreases remove 4 stitches total.
Increase rounds: At each quarter marker, work one additional dc in a suitable solid dc position. Four increases add 4 stitches total.
VISUAL MILESTONE After Round 36: fitted tube, gently shaped waist, straight vertical eyelet columns.
Step 4 – Divide the Body & Begin the Front Yoke
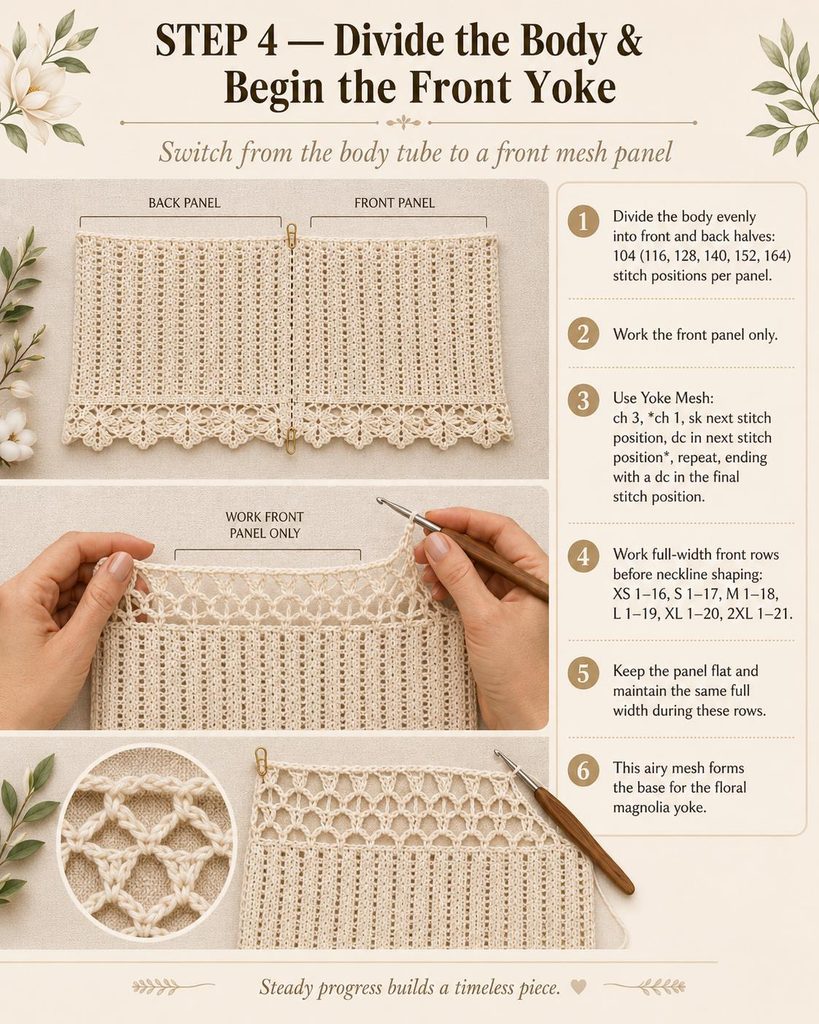
Visual guide – split the upper body into equal front and back halves and begin Yoke Mesh.
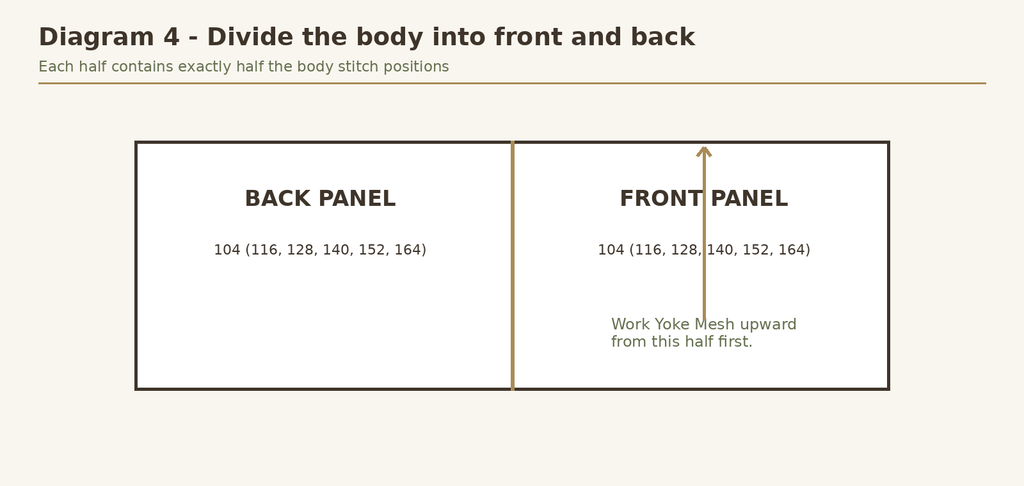
Diagram guidance – each half contains 104 (116, 128, 140, 152, 164) stitch positions.
1. Mark the two side points so the body is divided evenly.
2. Front half: 104 (116, 128, 140, 152, 164) stitch positions. Back half: the same.
3. Work the front panel only in Yoke Mesh.
4. Work full-width front rows: XS Rows 1-16; S 1-17; M 1-18; L 1-19; XL 1-20; 2XL 1-21. Keep the full stitch-position count
unchanged.
VISUAL CHECK The yoke fabric should be noticeably more open than the torso fabric and should lie flat without gathering at the transition.
Step 5 – Shape the Front Neckline & Shoulders
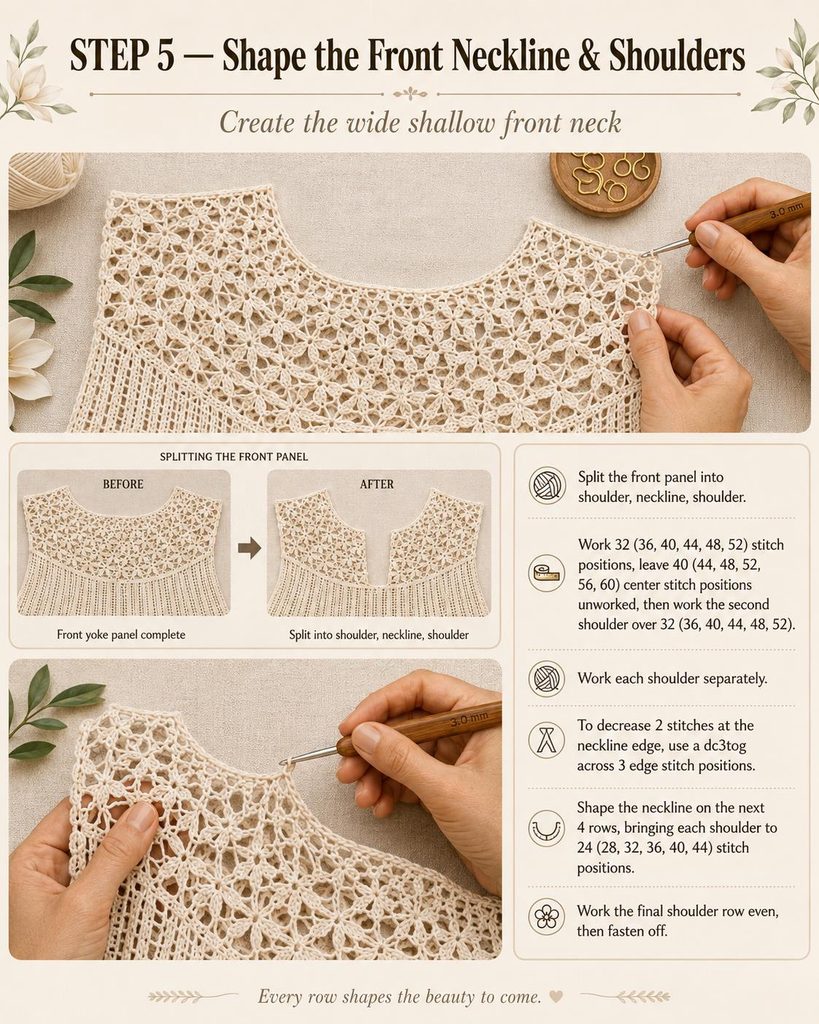
Visual guide – split the front yoke and shape a wide, shallow neckline.
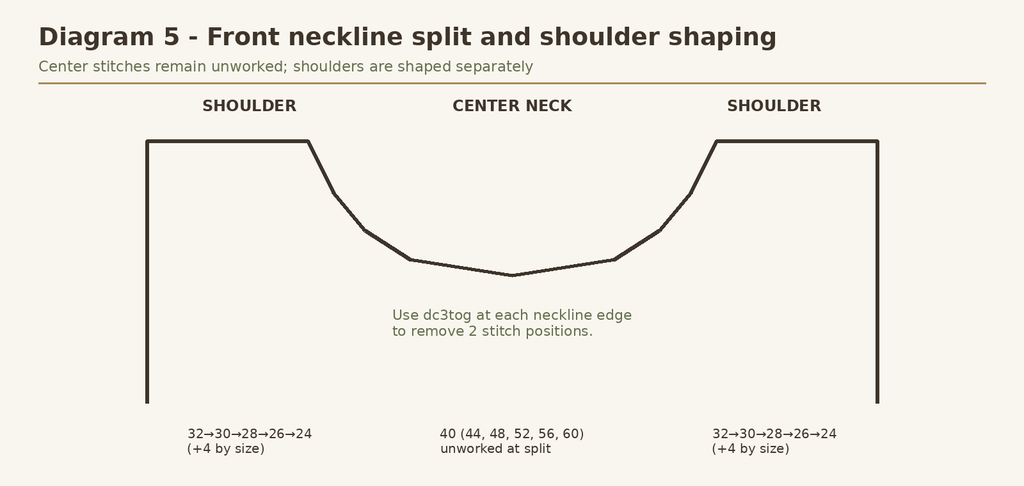
Diagram guidance – center neckline stitches remain unworked while each shoulder is shaped independently.
| Size | First Shoulder | Center Neck Unworked | Second Shoulder | Final Shoulder |
|---|---|---|---|---|
| XS | 32 | 40 | 32 | 24 |
| S | 36 | 44 | 36 | 28 |
| M | 40 | 48 | 40 | 32 |
| L | 44 | 52 | 44 | 36 |
| XL | 48 | 56 | 48 | 40 |
| 2XL | 52 | 60 | 52 | 44 |
1. On the split row, work the first shoulder count shown above. Leave the center-neck count unworked. Join yarn to the opposite side and
work the second shoulder count.
2. Work shoulders separately.
3. At each neckline edge, use dc3tog across three edge stitch positions to reduce the row by exactly 2 stitch positions.
4. Repeat neckline shaping for four rows, producing shoulder counts: 32→30→28→26→24 for XS, with the same 2-stitch reduction
sequence applied to each graded size.
5. Work one final shoulder row even at 24 (28, 32, 36, 40, 44) stitch positions. Fasten off.
CHECK Both front shoulders must finish with identical stitch-position counts before the back yoke is joined.
Step 6 – Crochet the Back Yoke & Join the Shoulders
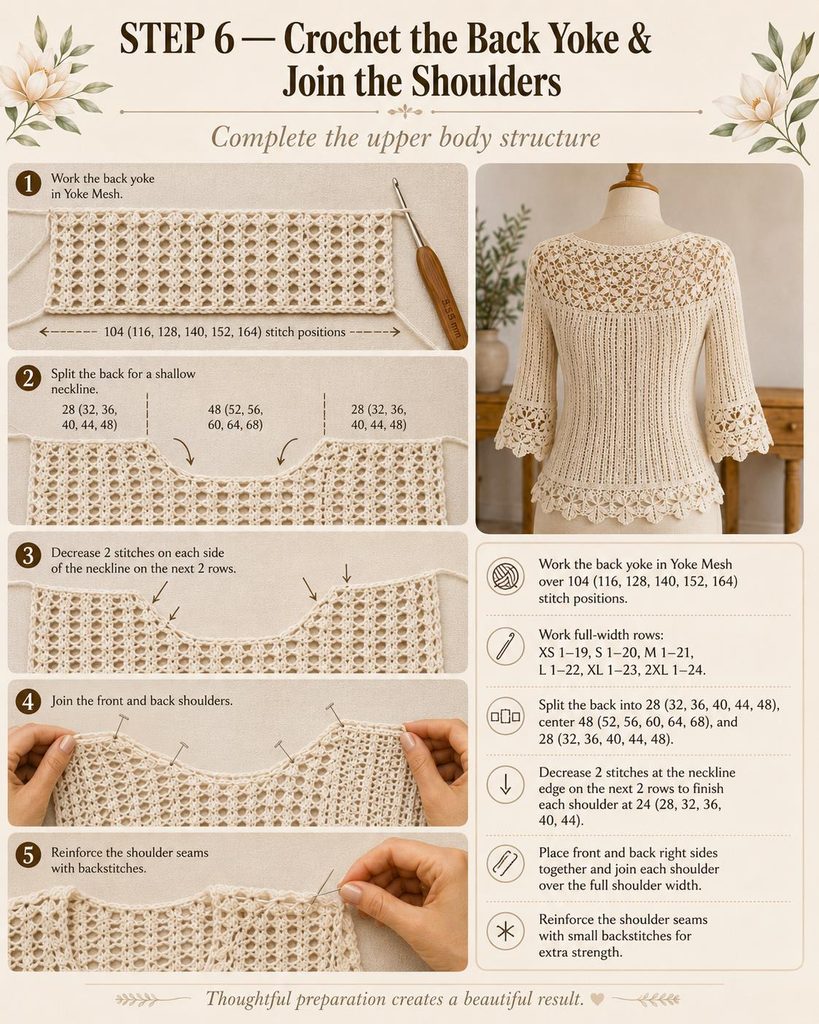
Visual guide – back yoke, shallow back neckline, and reinforced shoulder joining.
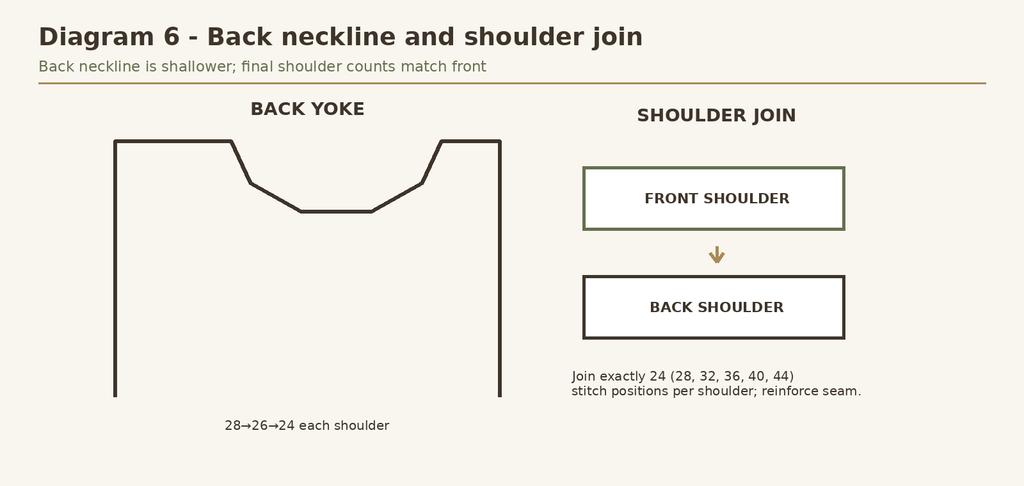
Diagram guidance – the back neckline uses two shaping rows, and the final back shoulder count exactly matches the front.
1. Work Yoke Mesh over the back half: 104 (116, 128, 140, 152, 164) stitch positions.
2. Work full-width rows: XS 1-19; S 1-20; M 1-21; L 1-22; XL 1-23; 2XL 1-24.
3. Split the back: first shoulder 28 (32, 36, 40, 44, 48); leave center 48 (52, 56, 60, 64, 68) unworked; work second shoulder 28 (32, 36,
40, 44, 48).
4. On each shoulder, decrease 2 stitch positions at the neckline edge on each of the next two rows, finishing at 24 (28, 32, 36, 40, 44).
5. Place front and back RS together. Join corresponding shoulders over exactly 24 (28, 32, 36, 40, 44) stitch positions.
6. Reinforce each shoulder with a discreet second line of small backstitches using matching yarn.
STRUCTURAL CHECK Do not stretch the mesh while joining. The shoulder seam should be stable enough to resist neckline growth.
Step 7 – Crochet the Magnolia Flowers
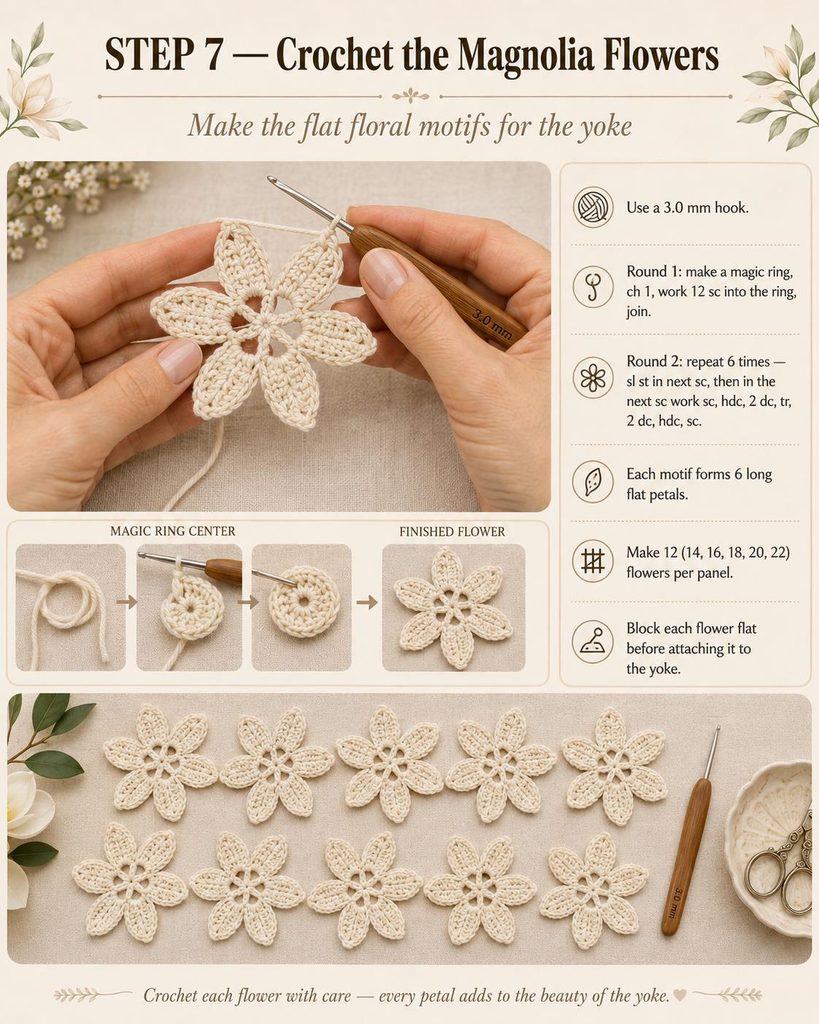
Visual guide – crochet the flat six-petal magnolia motifs.
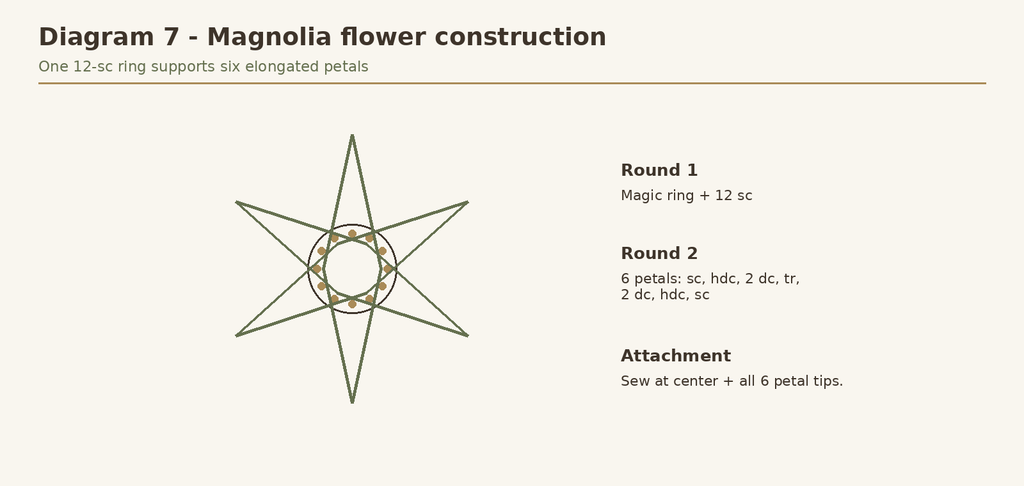
Diagram guidance – a 12-sc center ring is worked as six pairs of stitches, one pair per elongated petal.
1. Use 3.0 mm hook.
2. Round 1: make magic ring, ch 1, work 12 sc into ring; join. [12 sc]
3. Round 2: repeat 6 times – sl st in next sc; in next sc work sc, hdc, 2 dc, tr, 2 dc, hdc, sc. [6 petals]
4. Fasten off leaving a long sewing tail and block the flower flat.
5. Make 12 (14, 16, 18, 20, 22) flowers for each yoke panel.
ATTACHMENT RULE When attached later, secure each flower at its center and at all six petal tips. The motif should merge visually with the mesh instead of sitting as a loose raised applique.
Step 8 – Crochet Leaves & Attach the Yoke Motifs
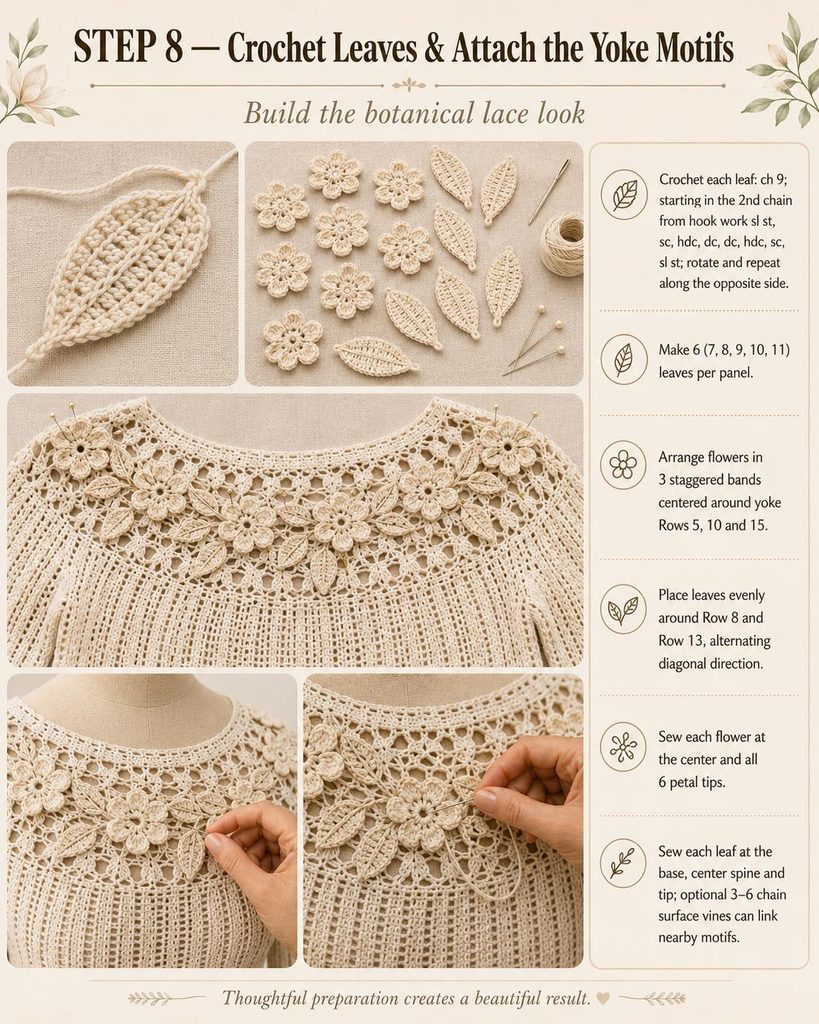
Visual guide – make leaves, pin the entire arrangement, then sew motifs securely.
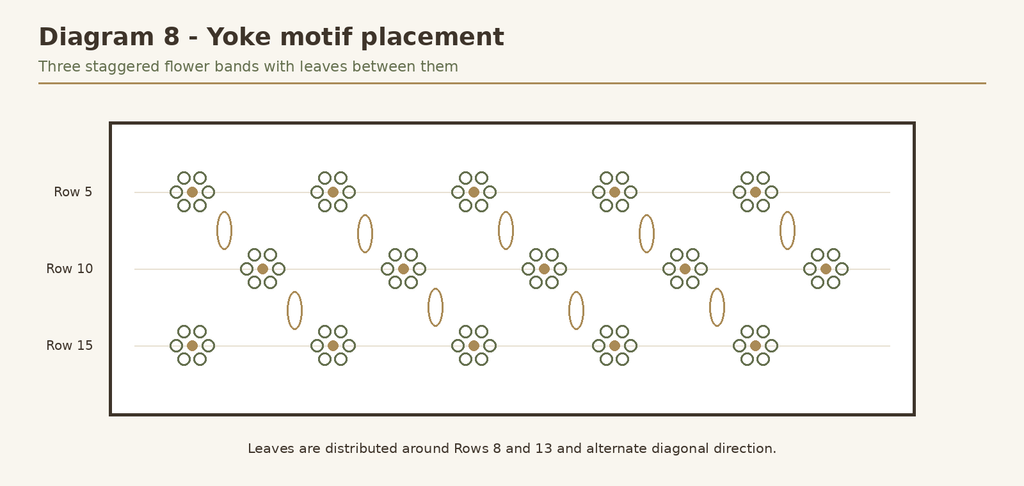
Diagram guidance – flowers sit in three staggered bands centered around Yoke Rows 5, 10 and 15. Leaves bridge the spaces around Rows 8 and 13.
1. Leaf: ch 9. Starting in 2nd ch from hook work sl st, sc, hdc, dc, dc, hdc, sc, sl st. Rotate; repeat along the opposite side of the
foundation chain. Fasten off with a sewing tail.
2. Make 6 (7, 8, 9, 10, 11) leaves per panel.
3. Flowers per band – XS: 4/4/4; S: 5/4/5; M: 5/6/5; L: 6/6/6; XL: 7/6/7; 2XL: 7/8/7.
4. Pin every motif before sewing. Lower and upper bands are evenly spaced; the middle band is staggered between them.
5. Place leaves approximately around Rows 8 and 13, alternating diagonal direction.
6. Sew flowers at center plus all six petal tips. Sew leaves at base, center spine and tip. Optional 3-6 chain surface vines may connect
nearby motifs if they do not pucker the yoke.
VISUAL MILESTONE The upper chest should read as a continuous botanical lace field, while enough open mesh remains visible to keep the yoke light and flexible.
Step 9 – Crochet the Sleeves & Decorative Cuffs
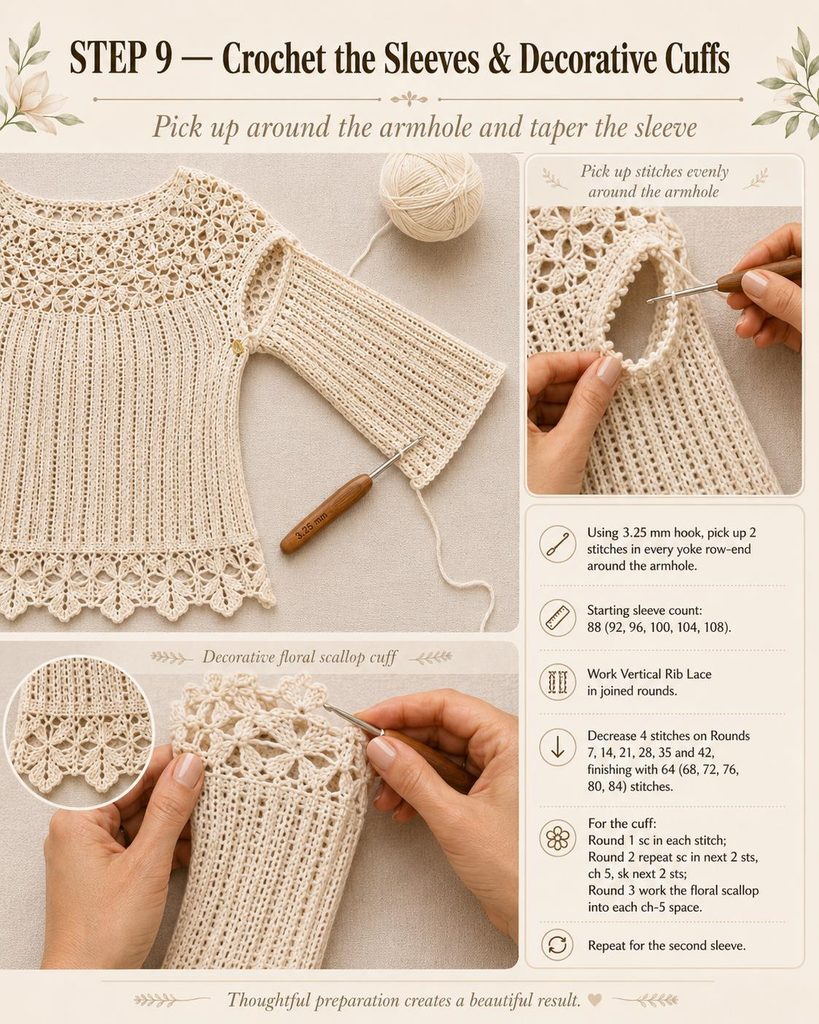
Visual guide – pick up around each armhole, taper the sleeve, then add the pointed cuff border.
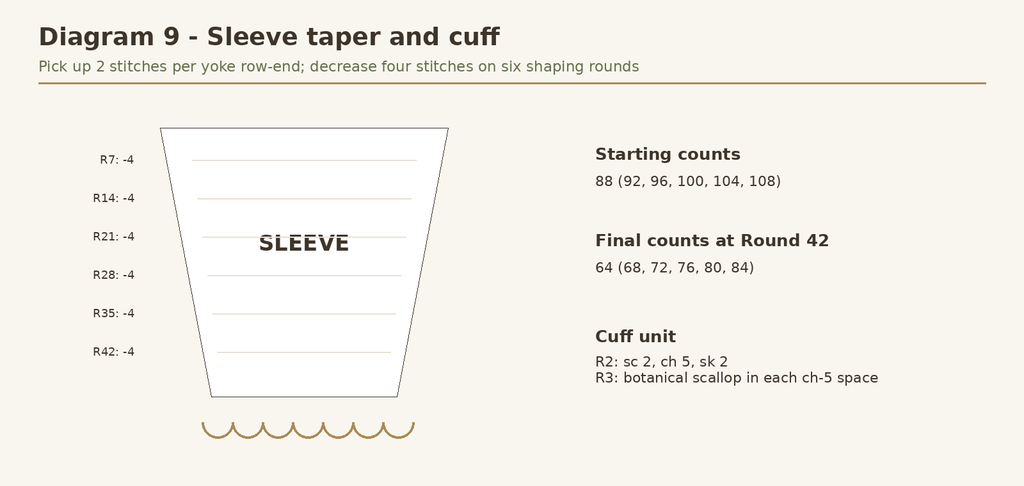
Diagram guidance – each shaping round removes 4 stitches total; six shaping rounds remove 24 stitches from the starting sleeve count.
| Round(s) | XS | S | M | L | XL | 2XL |
|---|---|---|---|---|---|---|
| Start / 1-6 | 88 | 92 | 96 | 100 | 104 | 108 |
| 7 | 84 | 88 | 92 | 96 | 100 | 104 |
| 8-13 | 84 | 88 | 92 | 96 | 100 | 104 |
| 14 | 80 | 84 | 88 | 92 | 96 | 100 |
| 15-20 | 80 | 84 | 88 | 92 | 96 | 100 |
| 21 | 76 | 80 | 84 | 88 | 92 | 96 |
| 22-27 | 76 | 80 | 84 | 88 | 92 | 96 |
| 28 | 72 | 76 | 80 | 84 | 88 | 92 |
| 29-34 | 72 | 76 | 80 | 84 | 88 | 92 |
| 35 | 68 | 72 | 76 | 80 | 84 | 88 |
| 36-41 | 68 | 72 | 76 | 80 | 84 | 88 |
| 42 | 64 | 68 | 72 | 76 | 80 | 84 |
1. Using 3.25 mm hook, join yarn at underarm. Pick up exactly 2 stitches in every front and back yoke row-end around the armhole.
Starting count: 88 (92, 96, 100, 104, 108).
2. Work VRL in joined rounds and follow the sleeve count table above. Distribute each 4-stitch decrease evenly, keeping BOR at
underarm.
3. Cuff Round 1 with 3.0 mm hook: sc in each stitch. Count remains 64 (68, 72, 76, 80, 84).
4. Cuff Round 2: *sc in next 2 sts, ch 5, sk next 2 sts* around. Units: 16 (17, 18, 19, 20, 21).
5. Cuff Round 3: in each ch-5 sp work sc, hdc, 2 dc, tr, ch 3, sl st in first ch, tr, 2 dc, hdc, sc; sl st across the two intervening sc. Fasten
off.
6. Repeat identically for second sleeve.
Step 10 – Hem, Neckline & Final Finishing
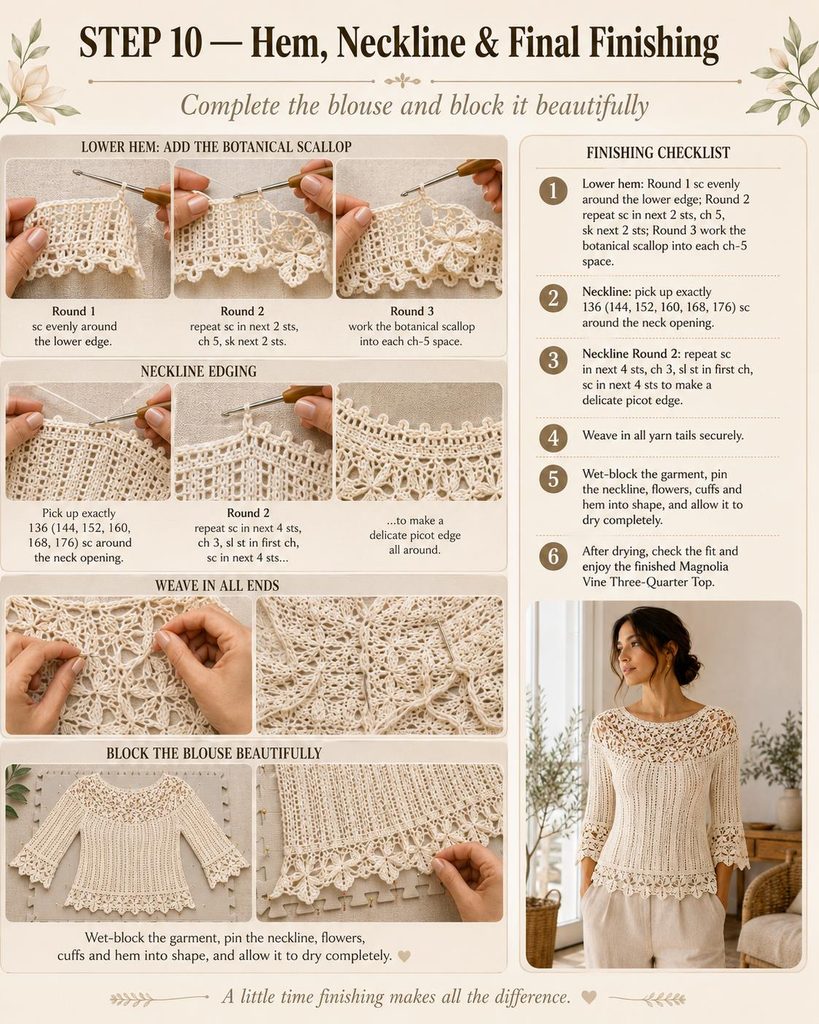
Visual guide – finish the lower hem, neckline, ends and blocking.
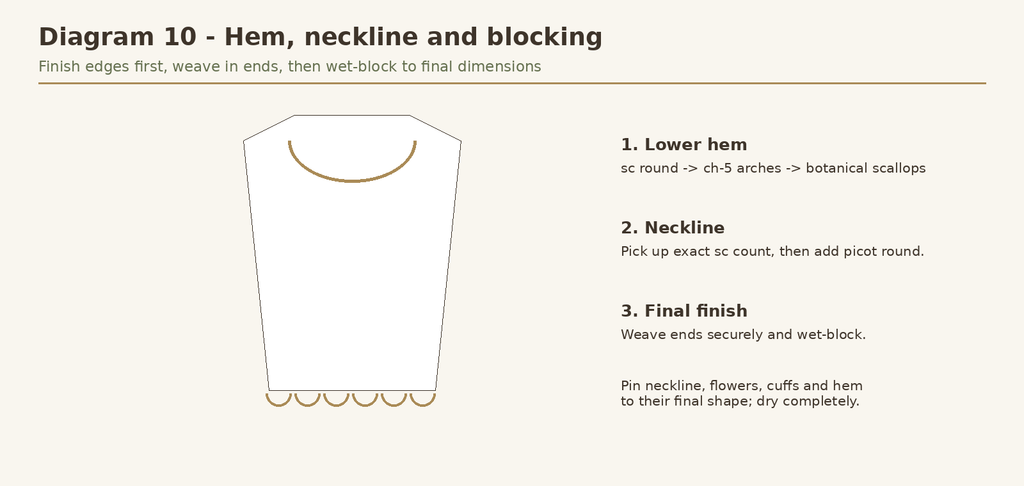
Diagram guidance – edge finishing sequence: hem -> neckline -> weave ends -> wet-block and pin all decorative points.
Lower Hem Border
1. With 3.0 mm hook, attach yarn to lower foundation edge. Round 1: sc evenly around. Count: 208 (232, 256, 280, 304, 328).
2. Round 2: *sc in next 2 sts, ch 5, sk next 2 sts* around. Units: 52 (58, 64, 70, 76, 82).
3. Round 3: in each ch-5 sp work sc, hdc, 2 dc, tr, ch 3, sl st in first ch, tr, 2 dc, hdc, sc; sl st across the next 2 sc. Repeat around. Fasten
off.
Neckline
1. Using 2.75-3.0 mm hook, pick up exactly 136 (144, 152, 160, 168, 176) sc evenly around the complete neckline. Join.
2. Round 2: *sc in next 4 sts, ch 3, sl st in first ch, sc in next 4 sts* around. Repeat count: 17 (18, 19, 20, 21, 22). Join and fasten off.
3. The neckline must lie flat. If it waves or pulls inward, recheck pickup distribution rather than altering the required count casually.
Final Finishing
1. Inspect both shoulder joins and confirm sleeves match in length.
2. Weave all yarn tails securely on the WS without distorting openwork.
3. Wet-block garment. Shape neckline into a broad shallow curve; pin flower petals, leaf tips, cuff points and hem points individually.
4. Allow to dry completely before removing pins.
5. Let the garment hang for several hours before evaluating final body and sleeve length, especially with cotton-bamboo yarn.
FINAL VISUAL CHECK Finished silhouette: fitted vertical body, shaped waist, broad neckline, botanical yoke, three-quarter sleeves, floral cuffs and scalloped hem.
Fit Adjustments
| Adjustment | Method |
|---|---|
| More fitted | Choose the smaller size when between sizes. |
| More ease | Choose the larger size. |
| Longer torso | Add VRL rounds after Round 33 and before dividing for the yoke. |
| Shorter torso | Remove rounds from the same area. |
| Longer sleeves | Add plain VRL rounds between Rounds 36-41. |
| Shorter sleeves | Remove plain rounds before final sleeve decrease/cuff. |
SCALING CAUTION When changing length, preserve the stated stitch counts and shaping schedule. Do not change cuff or hem repeat counts unless you intentionally change circumference as well.
Final Quality-Control Checklist
• Gauge matched after blocking. • Body returns to original stitch count by Round 33. • Front and back shoulder counts match exactly. • Each armhole pickup equals 2 stitches per yoke row-end. • Sleeve counts remain divisible by 4 at the cuff. • Neckline pickup count is exact and lies flat. • Motifs are secured without gathering the mesh. • All yarn tails are woven in securely. • Garment is fully wet-blocked before final fit evaluation.
Pattern Status
Validated commercial pattern version. This document preserves the validated stitch counts, construction sequence, and sizing from the final pattern audit. Because the original reference is a single front-facing image, the exact hidden back construction and exact original lace architecture cannot be independently verified from the photograph alone.
SOURCE OF TRUTH For production and customer support, use this written pattern as the authoritative source rather than text embedded inside the visual tutorial images.