Crochet Jasmine Panel Tote Bag: Free Step-by-Step Pattern
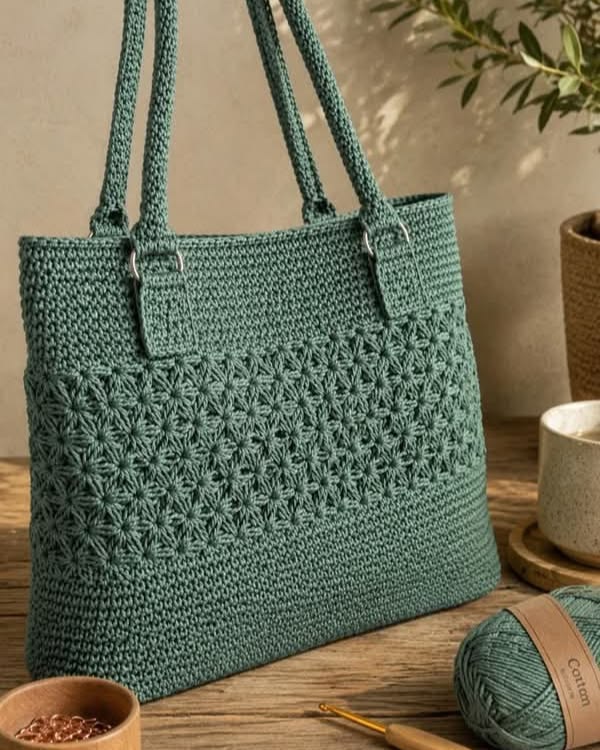
This elegant crochet tote combines two textures: a firm, knit-look body and a raised floral Jasmine panel. The result is a structured everyday handbag that looks much more complicated than it actually is.
The construction used here is deliberately practical. Instead of trying to change from waistcoat stitch into Jasmine stitch in the middle of the bag which would make the stitch counts and fabric thickness difficult to control the tote is crocheted first as a strong seamless body. The Jasmine panel is made separately, blocked to exact measurements, and invisibly sewn to the front.
That also makes the finished bag stronger.
Finished measurements
The finished bag is approximately:
- Width: 40 cm / 15.75 in
- Height: 30 cm / 11.8 in
- Depth: 10 cm / 4 in
- Jasmine panel: 24 × 14 cm / 9.5 × 5.5 in
- Handle drop: approximately 24–26 cm / 9.5–10.25 in
Skill level: Intermediate
The pattern uses standard US crochet terminology. The Craft Yarn Council uses abbreviations such as ch, sc, sl st, st, rnd, and yo, which are also used below.
Materials
You will need:
- 850–1,050 m of sturdy DK/light-worsted cotton or cotton-blend yarn
- Approximately 500–600 g if your yarn is around 170–200 m per 100 g
- 4 mm crochet hook
- 4.5 mm crochet hook
- Optional 5 mm hook if your Jasmine puffs are too tight
- 4 metal D-rings, 25–30 mm
- Stitch markers
- Tapestry needle
- Strong sewing thread and needle
- Scissors
- Approximately 0.5 m lining fabric
- Optional 18 mm magnetic snap
- Optional plastic canvas or bag-base stabilizer approximately 38 × 8 cm
For a bag like the reference, choose a muted sage, eucalyptus, dusty green, or grey-green cotton.
Gauge
Gauge is important because this bag is structured.
With the 4.5 mm hook in center single crochet:
18 stitches × 20 rounds = 10 × 10 cm
With the 4 mm hook in ordinary single crochet:
18 stitches × approximately 20 rows = 10 × 10 cm
If your gauge is significantly different, change hook size before continuing.
The Jasmine panel is intentionally made to measurement rather than relying on a universal stitch count, because puff size changes considerably with yarn, hook size, and how far each loop is drawn up. This is more reliable than pretending one puff count will fit every crocheter.
Abbreviations
ch = chainsc = single crochetcsc = center single crochet / waistcoat stitchsl st = slip stitchst(s) = stitch(es)yo = yarn overrnd = roundFP = foundation puffJ3 = three-puff Jasmine cluster
The waistcoat stitch is simply a single crochet worked through the center of the V-shaped post rather than under the top loops. This creates the dense knit-like surface seen in the photo. It works particularly well in continuous rounds, where all the V stitches face the same direction.
Step 1 : Crochet the rectangular base
Using the 4 mm hook:
Foundation: Ch 73.
Row 1: Sc in the second ch from the hook and in every ch across.
You should have 72 sc.
Rows 2–20: Ch 1, turn, sc in every stitch across.
Your base should measure approximately 40 × 10 cm.
Do not continue if the base is much larger or smaller. Adjust your hook until the measurement is correct.
For a more rigid handbag, cut a piece of plastic canvas approximately 38 × 8 cm and keep it aside. It will be inserted after the lining is made.
Step 2 : Establish the bag walls
The bag body is worked around the rectangular base.
Switch to the 4.5 mm hook.
Starting near one corner, work one setup round evenly around the perimeter:
- 72 sc across the first long edge
- 18 sc evenly across the first short edge
- 72 sc across the second long edge
- 18 sc evenly across the second short edge
Total: 180 stitches
Because the short side contains 20 row ends but you need 18 stitches, distribute the skipped row ends evenly rather than bunching them together.
Place a marker in the first stitch.
Do not increase at the corners. We now want the fabric to turn upward and become the walls of the bag.
Step 3 : Crochet the waistcoat-stitch body
From now on, work in a continuous spiral.
For each csc:
Insert the hook directly through the middle of the V-shaped post of the stitch below, yarn over, pull up a loop, yarn over, pull through both loops.
That is one center single crochet.
Rounds 2–59: Csc in every stitch around — 180 stitches each round.
Keep your tension relaxed. Waistcoat stitch becomes difficult to penetrate if it is crocheted too tightly; several established tutorials recommend working loosely or using a larger hook for this reason.
At the stated gauge, the body should now measure roughly 29 cm high from the base.
If your measurement reaches 29 cm a round or two earlier, stop by measurement rather than forcing the round count.
Step 4 : Strengthen the top edge
Switch to the 4 mm hook.
Work:
Round 60: Sc in every stitch around.
Round 61: Sc in every stitch around.
Fasten off invisibly.
The finished bag height should now be close to 30 cm.
Step 5 : Make the real Jasmine flower panel
The flower texture in your photo is characteristic of Jasmine stitch, which is built from linked puff stitches. Standard versions begin with a row of foundation puffs and then join groups of three puffs into flower-like clusters.
Use the 4.5 mm hook.
Foundation puff
Ch 2.
Draw the working loop upward to roughly 1.3–1.5 cm.
Working into the first chain:
[yo, insert hook, pull up a loop to the same height] three times.
You should now have 7 loops on the hook.
Hold a small section of the working yarn with your finger, yo, and draw through all seven loops.
Insert the hook into the strand you were holding, pull it through, then ch 1 to lock the puff.
That is your first FP.
Additional foundation puffs
Insert the hook into the small “eye” created at the top of the previous puff.
Again work three elongated yarn-over/pull-up-loop movements, close the puff, and ch 1.
Continue adding foundation puffs until the strip measures 24 cm wide.
With the suggested yarn and hook this will commonly be around 11–13 puffs, but 24 cm is the controlling measurement.
This avoids one of the most common Jasmine-pattern problems: using somebody else’s puff count with a completely different loop height.
Step 6 : Crochet the Jasmine rows
Turn the work.
First make one completed foundation puff at the edge. This is the anchor puff for the new row.
For each full Jasmine cluster, you will build three unclosed puff sections before closing everything together.
For the first cluster:
- In the top eye of the anchor puff, work three elongated
yo/pull-up-loopmovements. You now have 7 loops. - In the lower eye directly beneath it, work three more elongated loops. You now have 13 loops.
- In the next eye along the previous row, work three more. You now have 19 loops.
- Hold the working yarn, yo, pull carefully through all 19 loops, catch the held strand, and ch 1 to close.
That creates one J3 cluster.
Continue across the row by repeating the three-position cluster.
This “anchor puff + three connected puff sections” construction is the standard flat Jasmine-stitch logic described by established crochet tutorials.
Turn.
Begin every following row with a new anchor puff, then repeat the same J3 process across.
Continue until the panel measures approximately:
24 cm wide × 14 cm high
The stitch should form complete six-petal flowers.
Jasmine stitch is naturally thick and consumes considerably more yarn than ordinary stitches, so do not be surprised if the small panel uses more yarn than expected.
Step 7 : Block the Jasmine panel
Lay the panel flat.
Gently shape it to 24 × 14 cm.
For cotton, lightly mist or wet-block it according to the yarn manufacturer’s care instructions.
Do not stretch the flowers aggressively; you want the flower centers compact and the outer edge straight.
Allow it to dry completely.
Step 8 : Position the floral panel
Lay the bag flat with the future front side facing upward.
Center the Jasmine rectangle horizontally.
For a bag measuring 40 cm wide:
- approximately 8 cm plain fabric should remain on the left
- approximately 8 cm plain fabric should remain on the right
Place the bottom of the floral panel approximately 6 cm above the base.
That leaves approximately 10 cm of plain fabric above the panel, closely matching the visual proportions of the reference bag.
Pin or clip the panel securely.
Step 9 : Sew the Jasmine panel to the bag
Thread a tapestry needle with matching yarn.
Using tiny whip stitches, sew around the outside edge of the Jasmine panel.
Catch only:
- the outer closing loops of the Jasmine fabric
- one or two strands of the waistcoat-stitch body underneath
Avoid pulling tightly or the bag front will pucker.
Every few centimeters, check that the panel is still square.
Because the underlying bag is complete and structurally sound, this panel is decorative rather than load-bearing.
Step 10 : Crochet four D-ring tabs
Use the 4 mm hook.
Make four identical pieces.
Ch 7.
Row 1: Sc in second ch from hook and across — 6 sc.
Rows 2–14: Ch 1, turn, sc across — 6 sc.
Each tab should measure roughly 3.3 × 7 cm.
Fasten off leaving a long sewing tail.
Step 11 : Attach the D-rings
Slide approximately 2 cm of one short end through a D-ring.
Fold that end to the back of the tab.
Using strong matching thread or yarn, sew through both layers several times immediately below the ring.
The remaining length of the tab lies flat against the bag.
On the front of the tote, position the centers of the two tabs approximately:
10 cm and 30 cm from the left side
Repeat the same positioning on the back.
Keep the top of each D-ring approximately 1–1.5 cm below the top edge.
Sew each tab to the bag using a strong rectangle-and-X formation.
Do this before inserting the lining so all reinforcing stitches will later be hidden.
Step 12 : Crochet two strong cord handles
For the handle shape in the reference, a Romanian crochet cord is a good match because it creates a compact, durable strap and is commonly used for bag handles.
Hold two strands of your yarn together and use the 5 mm hook.
Make two cords.
Romanian cord
Ch 2.
Sc in the second ch from the hook.
Rotate the tiny piece 180 degrees in the same direction.
Work one sc through the visible side loop.
Rotate again.
From now on you will see two side loops beside the hook.
Insert the hook under both side loops and work one sc.
Rotate 180 degrees again.
Repeat:
rotate → sc under both side loops
until the cord measures approximately 72 cm.
Make a second identical cord.
Step 13 : Attach the handles
Pass one end of the first cord through the left D-ring on the front.
Fold back approximately 4 cm.
Sew the doubled section very firmly using matching yarn.
Pass the opposite end through the second front D-ring and repeat.
The usable handle length will be roughly 64 cm, giving a drop of approximately 24–26 cm.
Attach the second handle to the two rings on the back.
Check that both handles are exactly the same height before securing your final stitches.
Step 14 : Add the lining
A lining is strongly recommended because Jasmine stitch and crochet handles can otherwise stretch under weight.
For a simple fitted lining, cut:
- 2 rectangles: 42 × 32 cm
- 1 gusset strip: 12 × 102 cm
These measurements include approximately 1 cm seam allowances.
With right sides together, sew the gusset around the left side, bottom, and right side of one rectangle.
Clip the corner seam allowances carefully.
Sew the second rectangle to the opposite side of the gusset.
Press.
If adding a magnetic snap or internal pocket, install it now.
Fold the top lining edge inward so the liner sits approximately 5–8 mm below the crochet rim.
Insert the lining.
Hand-sew it to the inside top edge using small invisible stitches.
If desired, slide the 38 × 8 cm plastic-canvas base between the crochet bottom and lining before finishing the seam.
Step 15 : Final shaping
Lightly steam or wet-block the finished bag according to the yarn label.
Shape the base into a clean 40 × 10 cm rectangle.
Straighten the front and back.
Check that:
- both D-ring pairs are level
- both handles have equal drop
- the Jasmine panel is centered
- the top rim is not stretched
- the lining does not pull on the crochet shell
Your bag is finished.
Why this construction works
The reconstructed design separates the three jobs of the bag.
The waistcoat-stitch body gives the clean knit-like structure seen in the photo. Waistcoat stitch is dense and sturdy, which makes it well suited to bags.
The Jasmine panel supplies the raised six-petal floral texture without making the entire bag excessively heavy or yarn-hungry.
The D-rings, reinforced tabs, lined body, and Romanian cord handles transfer carrying load through stronger parts of the bag instead of pulling directly on the flower stitches.
Troubleshooting
If the Jasmine flowers have large holes in the center, your elongated loops are probably too loose or inconsistent. Try a slightly smaller hook and keep every loop the same height.
If you cannot pull your hook through all 19 loops, relax the puff tension or move up 0.5 mm in hook size.
If the waistcoat stitch is almost impossible to enter, your tension is too tight. The center-single-crochet stitch needs enough room between the two legs of each V for the hook to pass.
If the body flares outward, you accidentally increased stitches. Every wall round must stay at 180 stitches.
If the body narrows toward the top, you probably skipped csc posts. Count periodically and use markers every 30 stitches.