Emerald Off-Shoulder Crochet Lace Dress Pattern With Split Cape Sleeves
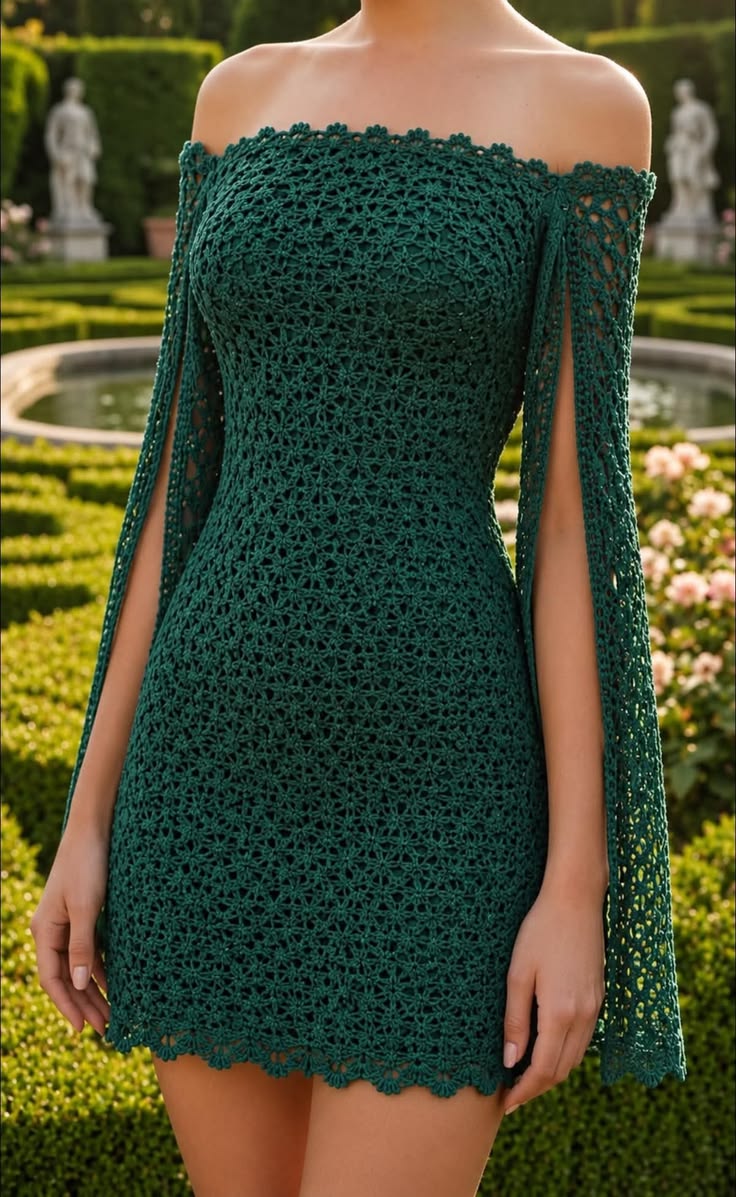
This elegant off-the-shoulder crochet dress combines a fitted floral-lace body with dramatic open split sleeves and delicate scalloped edging. The deep emerald color gives it an evening-dress feel, while the lightweight lace construction keeps the finished garment feminine and airy.
Although the finished dress looks extremely intricate, its construction can be simplified into three main pieces: a seamless fitted body, two flat lace sleeve panels, and decorative edging around the neckline, sleeves, and hem.
The pattern below is an original reconstruction inspired by the garment shown in the reference image. The exact stitch chart or original designer’s pattern cannot be reliably recovered from a photograph alone, so this version recreates the silhouette, proportions, lace density, off-shoulder neckline, and open sleeve effect using a repeatable flower-cluster mesh.
Pattern Overview
Skill level: Intermediate to advanced
Terminology: US crochet terms
Construction: Seamless body worked in joined rounds with separately crocheted split sleeves
Fit: Very close fitting
Length: Mini dress
Neckline: Straight off-the-shoulder
Sleeves: Long open cape/split sleeves
Recommended yarn: Fine #2 or light fingering-weight cotton blend
Hooks: 2.75 mm, 3.25 mm and 3.5 mm
Optional: 6–8 mm soft elastic for neckline stabilization
Because lace stretches considerably after blocking and during wear, this dress should be fitted from actual body measurements rather than simply choosing a conventional dress size. The Craft Yarn Council recommends measuring the bust, waist and hip and considering the intended amount of ease when sizing fitted garments. Craft Yarn Council
Finished Sizes
This pattern is written for XS through 2XL.
| Size | Approx. Body Bust | Approx. Body Waist | Approx. Body Hip |
|---|---|---|---|
| XS | 76–81 cm | 61–66 cm | 84–89 cm |
| S | 81–86 cm | 66–71 cm | 89–94 cm |
| M | 91–96 cm | 76–81 cm | 99–104 cm |
| L | 101–106 cm | 86–91 cm | 109–114 cm |
| XL | 111–117 cm | 96–102 cm | 119–125 cm |
| 2XL | 122–127 cm | 107–112 cm | 130–135 cm |
The dress is intended to stretch gently over the body, so the finished circumference can be approximately 2–5 cm smaller than the actual body measurement, depending on your yarn and personal preference.
Make a generous blocked gauge swatch before choosing your size.
Materials
You will need approximately:
XS: 1,050–1,150 m
S: 1,150–1,300 m
M: 1,300–1,450 m
L: 1,450–1,600 m
XL: 1,600–1,800 m
2XL: 1,800–2,000 m
Also prepare:
- Fine #2 or light fingering-weight yarn
- 2.75 mm crochet hook
- 3.25 mm crochet hook
- 3.5 mm crochet hook
- Stitch markers
- Measuring tape
- Tapestry needle
- Scissors
- Blocking pins
- Optional 6–8 mm soft elastic
- Optional matching slip dress or lining
For the luxurious lace appearance in the reference, choose a smooth yarn with excellent stitch definition.
Good fiber options include cotton-viscose, cotton-bamboo, mercerized cotton, cotton-silk, or a fine microfiber blend.
Avoid very fuzzy yarn because it will hide the floral structure.
Recommended Color
A dark jewel tone is particularly effective.
The inspiration garment is closest to:
Deep emerald / bottle green
Other excellent choices include:
- Black
- Burgundy
- Midnight blue
- Ivory
- Champagne
- Dark plum
- Forest green
Gauge
Gauge is measured after blocking.
Using the 3.5 mm hook in the Flower-Star Mesh:
4 complete lace repeats = approximately 10 cm
8 pattern rounds = approximately 10–11 cm
The exact row gauge is less important than the horizontal repeat gauge because body length can easily be adjusted.
If four repeats measure less than 10 cm, use a larger hook.
If they measure more than 10 cm, use a smaller hook.
Abbreviations
This pattern uses standard US crochet abbreviations. Craft Yarn Council
ch = chainsc = single crochetdc = double crochetsl st = slip stitchst = stitchsp = spacernd = roundyo = yarn overcl = clusterpicot = decorative chain loop
Special Stitch: 3-Double-Crochet Cluster
Yarn over.
Insert the hook into the indicated stitch or space.
Yarn over and pull up a loop.
Yarn over and pull through two loops.
Repeat this twice more in the same location.
You should now have four loops on your hook.
Yarn over and pull through all four loops.
That completes one 3-dc cluster.
Special Stitch: Flower-Star V
In the indicated space work:
3-dc cluster, ch 2, 3-dc cluster
This small paired cluster creates the star-like floral points repeated throughout the fabric.
Flower-Star Mesh Pattern
The body uses one main lace repeat.
After the setup round, repeat:
Flower-Star V in the ch-2 center of the Flower-Star V below, ch 3
around.
Because every new Flower-Star V is stacked over the one below it, the paired clusters create tiny repeated flower and diamond shapes similar to the texture visible in the inspiration dress.
The ch-3 spaces provide the open lace between the flowers.
Maintain the same number of Flower-Star V repeats unless specifically instructed otherwise.
Choosing the Body Repeat Count
At the stated blocked gauge, begin with:
XS: 34 repeats
S: 38 repeats
M: 42 repeats
L: 46 repeats
XL: 50 repeats
2XL: 54 repeats
Each repeat begins from six foundation stitches.
Foundation chain:
XS: 204
S: 228
M: 252
L: 276
XL: 300
2XL: 324
Before beginning the full dress, make a small test section and confirm that your repeat width matches the stated gauge.
Step 1: Make the Foundation
Using the 3.5 mm hook, chain the required number for your size.
Join with a slip stitch to form a large ring.
Take special care not to twist the chain.
Ch 1.
Sc in every chain around.
Join with sl st.
Your stitch count should still be:
204 (228, 252, 276, 300, 324) sc
Step 2: Establish the Flower-Star Lace
Ch 3.
Work one Flower-Star V in the same stitch.
Ch 3.
Skip the next 5 stitches.
Work a Flower-Star V in the next stitch.
Repeat:
ch 3, skip 5 stitches, Flower-Star V in next stitch
around.
Finish with ch 3 and join.
You should have:
34 (38, 42, 46, 50, 54) Flower-Star V repeats.
Step 3: Continue the Lace Body
Slip stitch carefully into the ch-2 space at the center of the first Flower-Star V.
Ch 3.
Work a Flower-Star V in the same ch-2 space.
Ch 3.
Work the next Flower-Star V into the ch-2 center of the next Flower-Star V.
Continue:
Flower-Star V in next center space, ch 3
around.
Join.
Repeat this round throughout the main body of the dress.
The vertical alignment of the motifs is what creates the small repeating floral-star appearance.
Step 4: Crochet the Lower Hip Section
Using the 3.5 mm hook, continue the lace pattern until the dress measures approximately:
18–22 cm from the foundation edge.
This section will sit over the lower hip and upper thigh.
Do not begin waist shaping too early.
Try the tube around the hips after lightly stretching it sideways.
It should fit without opening the lace excessively.
Step 5: Shape Toward the Waist
Instead of suddenly removing lace motifs and creating obvious diagonal breaks, this design uses controlled hook changes to contour the fabric.
Change to the 3.25 mm hook.
Continue the same Flower-Star Mesh for approximately:
6–8 cm.
Then change to the 2.75 mm hook.
Continue for approximately:
10–12 cm.
The smaller hook makes each lace repeat narrower and gradually draws the fabric inward at the waist.
This method works especially well with stretchy lace because it preserves the uninterrupted floral pattern visible in the inspiration garment.
Try the dress on periodically.
The smallest-hook section should sit around your natural waist.
Step 6: Expand Above the Waist
After the waist section, return to the 3.25 mm hook.
Continue the same lace pattern for approximately:
7–9 cm.
Then return to the 3.5 mm hook.
Continue toward the bust.
This gradual hook progression expands the fabric again without introducing noticeable increases.
Step 7: Crochet the Bust Section
Continue using the 3.5 mm hook until the upper edge reaches the level where you want the off-shoulder neckline to sit.
For the appearance in the reference photo, the upper edge should sit:
- above the fullest part of the bust
- below the collarbones
- approximately level with the upper arms
From the hem foundation to the top edge, a typical mini-dress body will measure approximately:
62–72 cm
depending on height and desired length.
Do not rely only on this measurement.
Try the dress on before fastening off.
Step 8: Stabilize the Off-Shoulder Neckline
An off-shoulder crochet dress needs neckline stabilization.
Without it, the lace can gradually stretch downward while being worn.
Change to the 2.75 mm hook.
Work one round of sc evenly around the top edge.
Do not add stitches.
Work a second sc round.
If the neckline already sits firmly, you can stop here.
For more security, use soft elastic.
Cut a length of 6–8 mm elastic that fits comfortably around the upper chest.
Overlap the ends by approximately 2 cm and sew them securely.
Place the elastic against the inside of the neckline.
Work one additional round of sc while gently crocheting around the elastic, taking care not to pierce it.
The elastic should remain free enough to move inside the crochet casing.
This helps the dress stay securely above the bust while maintaining the strapless appearance.
Step 9: Add the Decorative Neckline Border
Using the 2.75 or 3.25 mm hook, depending on desired delicacy, join yarn at the back.
Repeat around:
sc in next stitch, ch 3, skip one stitch, sc in next stitch
On the next round, work into each ch-3 space:
sc, 3 dc, picot, 3 dc, sc
If this border feels too large for your gauge, substitute:
sc, 2 dc, picot, 2 dc, sc
The result should be a small scalloped flower edge rather than a large ruffle.
Step 10: Crochet the First Split Sleeve
The dramatic sleeves in this dress are not ordinary closed sleeves.
They are essentially long lace panels that attach around the outer upper arm and remain open along the inner arm.
This produces the cape-like slit visible from shoulder to wrist.
Use the 3.5 mm hook.
For the sleeve foundation chain:
XS/S: ch 54
M/L: ch 60
XL/2XL: ch 66
The chain must be a multiple of six.
Work one row of sc.
Step 11: Establish the Sleeve Lace
Turn.
Ch 3.
Work Flower-Star V in the first stitch.
Ch 3.
Skip 5 stitches.
Work Flower-Star V in next stitch.
Continue across.
The approximate number of motifs will be:
9 (10, 11) depending on sleeve size.
Maintain this number throughout most of the sleeve.
Step 12: Crochet the Sleeve Length
Continue working flat rather than in rounds.
At the beginning of each row:
Turn.
Slip stitch carefully to the center ch-2 space of the first Flower-Star V.
Ch 3.
Work Flower-Star V in the same center.
Ch 3.
Continue across, working Flower-Star V into each Flower-Star V center from the previous row.
Continue until the sleeve panel measures approximately:
48–55 cm
or from the upper outer arm to about 3 cm above the desired finished wrist point.
The reference dress has very long sleeves, so allowing a little extra length creates the elegant draped effect.
Step 13: Taper the Split Sleeve
For the first half of the sleeve, use the 3.5 mm hook.
About halfway down the arm, change to the 3.25 mm hook.
For the final 12–15 cm, change to the 2.75 mm hook.
This creates a gentle taper toward the wrist without removing motifs and distorting the floral pattern.
If you prefer a wider dramatic cape sleeve, simply use the 3.5 mm hook throughout.
Step 14: Add the Sleeve Border
Along both long edges of the sleeve panel, work one row of sc.
Do not pull tightly.
Along the wrist edge, work:
sc, ch 3, skip one stitch
across.
Turn.
Into each ch-3 space work:
sc, 3 dc, picot, 3 dc, sc
Fasten off.
Step 15: Make the Second Sleeve
Repeat the entire sleeve pattern.
Before fastening off, lay both sleeve panels beside each other.
Confirm that they have:
- the same number of pattern rows
- the same length
- the same motif count
- matching borders
Step 16: Mark the Dress Sides
Lay the finished dress flat.
Mark both side points at the top edge.
Each side mark represents approximately the center of one upper arm.
Measure equal distances toward the front and back from each side mark.
For most sizes, mark approximately:
7–10 cm toward the front
and
7–10 cm toward the back
The total attachment area for each sleeve will therefore be approximately:
14–20 cm
depending on size and sleeve width.
Step 17: Attach the Split Sleeves
Find the center of the top edge of the first sleeve.
Pin that point to the side marker on the dress.
Pin the remaining sleeve top edge evenly toward the front and back neckline markers.
Using matching yarn and a tapestry needle, sew the sleeve securely to the neckline edge.
Only the top short edge of the sleeve is attached.
Do not sew the long edges together.
Those long edges remain open from approximately the upper arm to the wrist.
This creates the dramatic vertical sleeve slit seen in the reference.
Repeat for the opposite side.
Step 18: Optional Upper-Arm Security
If you want the sleeves to stay closer to the arms, make a tiny hidden connection approximately 4–6 cm below the top of each sleeve.
With matching yarn, join the two long edges together using:
ch 3, sl st to opposite edge
Fasten off.
This creates a small bridge under the upper arm while leaving the rest of the sleeve completely open.
Do not close the sleeve into a conventional tube.
Step 19: Add the Dress Hem
Return to the original foundation edge at the bottom of the dress.
Join yarn with the 3.25 mm hook.
Work one round of sc evenly around.
Next round:
Repeat:
sc in next stitch, ch 4, skip 2 stitches
around.
Adjust one small section at the side seam if necessary to complete the repeat evenly.
Step 20: Crochet the Scalloped Flower Hem
Into each ch-4 space work:
sc, 3 dc, picot, 3 dc, sc
Repeat around.
For a more delicate hem like the inspiration, replace the 3 dc on each side with 2 dc.
Fasten off.
Step 21: Weave In the Ends
Secure all ends carefully.
Pay particular attention to:
- neckline joins
- sleeve attachment points
- sleeve borders
- hem joins
- places where hook size changed
Weave each tail through several nearby stitches and back in the opposite direction.
Step 22: Block the Dress
Blocking is essential for fine lace.
Follow the care instructions for your yarn.
For most cotton or cotton-blend yarns:
Soak the dress gently in cool or lukewarm water.
Do not wring.
Press out excess moisture carefully.
Roll the dress in a towel.
Lay flat on blocking mats.
Shape the dress to the intended dimensions.
Open each floral motif gently with your fingers.
Straighten the neckline.
Make both sleeves exactly the same length.
Arrange every hem scallop.
Allow the garment to dry completely before moving it.
The lace will usually become more open and elegant after blocking.
Important Fit Check: Bust
Before attaching the sleeves, put the body on.
The floral mesh should follow the bust without becoming completely stretched flat.
If the holes become excessively large, the dress is too small.
If the fabric hangs away from the body, it is too large or needs a smaller hook in the bust area.
Important Fit Check: Waist
The smallest-hook section should sit over the natural waist.
If it sits too high, undo several rounds before the hook change and extend the torso.
If it sits too low, reduce the number of rounds before the waist section.
Individual torso length varies, which is why garment measurements should be checked on the actual wearer rather than relying only on a standard size chart. Craft Yarn Council
Important Fit Check: Hips
The lower dress must comfortably pass over the hips.
Always test this before completing the upper body.
If the foundation circumference will not pass over the widest part of the hips, increase the starting repeat count by:
2 or 4 complete repeats
Each additional repeat adds approximately 2.5 cm at the stated gauge.
Adjusting the Dress Length
For a shorter mini dress, remove pattern rounds from the lower hip section.
For a knee-length version, simply continue the 3.5 mm Flower-Star Mesh longer before beginning the waist shaping.
For a midi dress, the same principle works, but you may want to add a few extra lace repeats around the lower skirt so walking remains comfortable.
Making the Dress More Body-Conscious
For an even more fitted silhouette:
Use 3.5 mm over the hips.
Change to 3.25 mm earlier.
Work the waist with 2.75 mm.
Return gradually to 3.25 mm and 3.5 mm over the bust.
Do not use an extremely small hook to force the lace smaller because the fabric can become stiff.
Making the Dress Less Fitted
Use only two hook sizes.
Work most of the garment with 3.5 mm.
Change to 3.25 mm around the waist.
Return to 3.5 mm above the waist.
This produces gentler shaping.
Adding a Lining
Because this is a true openwork lace dress, a lining or slip is strongly recommended for normal wear.
The easiest solution is a separate fitted slip dress.
Choose:
- nude for a nearly invisible lining
- emerald for a rich monochrome effect
- black for stronger contrast
A separate slip also allows the crochet dress to stretch naturally without the lining restricting it.
If sewing a permanent lining, attach it only around the neckline and selected side points rather than stitching it to every part of the crochet.
Why the Split Sleeve Construction Works
The dramatic sleeve is one of the most distinctive features of the dress.
A normal crocheted sleeve would require a closed tube around the arm.
Here, the sleeve instead hangs from the upper side of the dress.
The two long edges remain unjoined, creating an uninterrupted opening from the upper arm to the wrist.
As the wearer moves, the lace falls behind and beside the arm like a narrow cape.
This reproduces the visual effect of the reference garment while remaining straightforward to crochet.
Why the Neckline Needs Elastic
A fitted crochet garment can gradually stretch from gravity and body movement.
This is especially noticeable in an off-shoulder dress because there are no shoulder straps supporting the garment.
A discreet elastic inside the upper border carries most of the load and prevents the lace from being permanently stretched.
Make the elastic comfortably snug rather than extremely tight.
The goal is support, not compression.
Common Problem: The Lace Is Too Open
Try a smaller hook.
You can also shorten the connecting chain from ch 3 to ch 2.
Do this consistently throughout an entire section rather than randomly changing individual spaces.
Common Problem: The Lace Is Too Dense
Move up 0.25–0.5 mm in hook size.
You can also change the connecting chains from ch 3 to ch 4 if you specifically want a more open evening-lace appearance.
Remember that blocking will also open the stitches.
Common Problem: The Dress Grows Longer After Blocking
This is common with cotton, bamboo and viscose.
Make a blocked swatch before beginning and compare its measurements before and after washing.
If your swatch grows significantly in length, stop crocheting the dress a few centimetres shorter than your intended final length.
Common Problem: The Sleeves Twist
The sleeves are worked flat, so twisting usually occurs during attachment.
Before sewing:
Lay the dress flat.
Lay each sleeve flat beside it.
Mark the center of the sleeve top.
Pin that center to the exact dress side.
Then pin equal amounts toward the front and back.
Only begin sewing once both sleeves hang symmetrically.
Common Problem: The Dress Slides Down
First check that the neckline elastic is firm enough.
If necessary, replace it with an elastic approximately 2–4 cm shorter.
You can also work one additional round of tight sc around the neckline using the 2.75 mm hook.
Do not drastically reduce the crochet neckline because it still needs to pass over the bust when putting the dress on.
Finishing Checklist
Before considering the dress complete, check that:
- the neckline is level
- the elastic is hidden
- both sleeves are the same length
- sleeve attachment points are symmetrical
- sleeve slits face inward toward the arms
- the waist shaping is centered correctly
- the lower hem is level
- every scallop is opened during blocking
- all yarn ends are secure
Care Instructions
Follow the yarn manufacturer’s care label first.
For most fine cotton-blend crochet garments:
Hand wash or use a gentle cycle.
Use cool water.
Do not wring.
Dry flat.
Reshape while damp.
Do not permanently store the dress on a hanger.
A hanger can gradually stretch both the neckline and the long open sleeves.
Fold the dress loosely for storage.