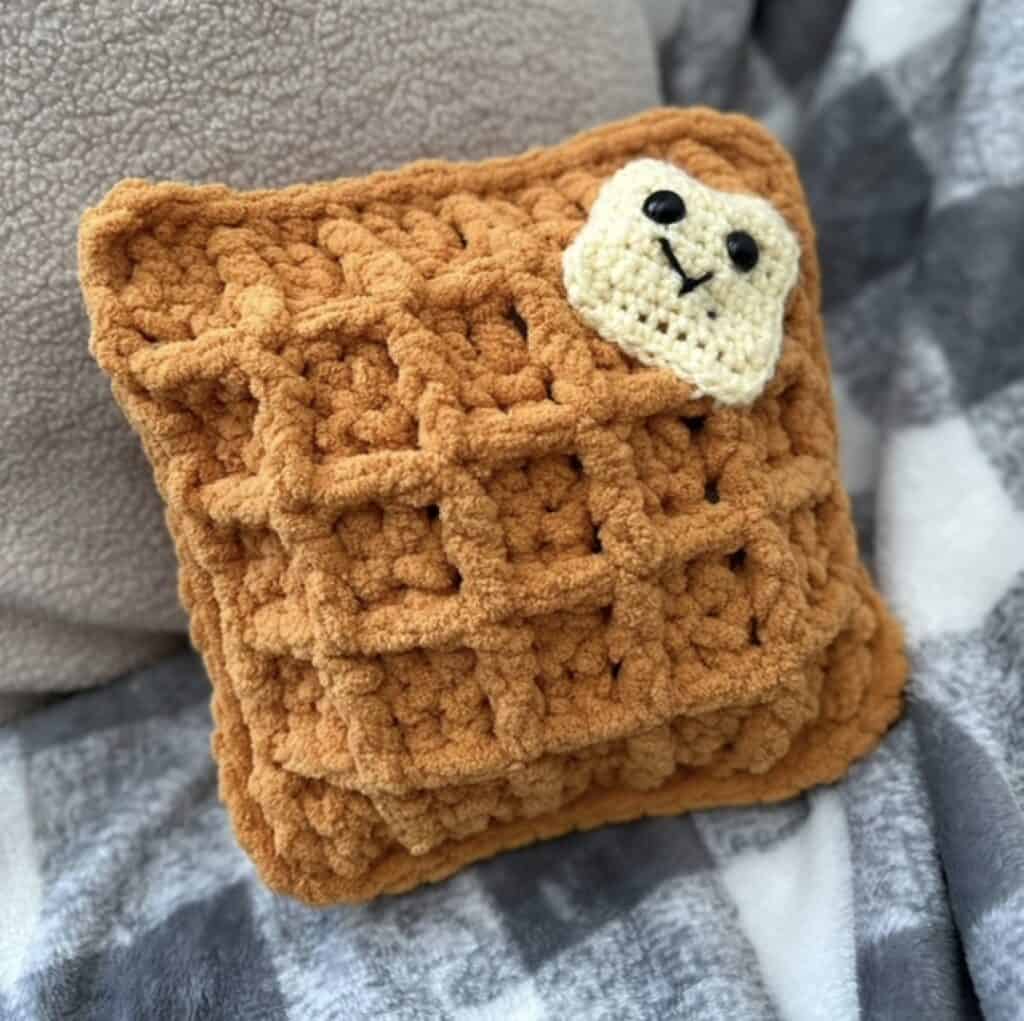
Waffle Pillow Free Crochet Pattern
Crocheting has long been a beloved craft, allowing individuals to express their creativity while creating functional and beautiful items for their homes. One of the most popular projects among crochet enthusiasts is the waffle stitch pillow. This delightful design not only adds a touch of warmth and texture to any living space but also serves as a cozy accessory that can elevate your home décor.
The waffle stitch, characterized by its unique raised pattern, mimics the look of a delicious waffle, hence its name. This stitch creates a visually appealing texture that is both inviting and stylish, making it a favorite choice for pillows, blankets, and other home accessories. The popularity of the waffle stitch pillow can be attributed to its versatility and ease of customization.
Whether you prefer bold colors or soft pastels, the waffle stitch can adapt to your personal style and the overall aesthetic of your home. Additionally, the pillow’s plush texture makes it perfect for snuggling up with on chilly evenings or adding a pop of color to your sofa or bed. In this blog post, we will provide you with a free crochet pattern for creating your very own waffle pillow, along with tips and tricks to help you master this delightful stitch.
Key Takeaways
- The waffle pillow crochet pattern is a fun and versatile project that adds a cozy touch to any home decor.
- Materials needed for the waffle pillow crochet pattern include yarn, crochet hook, and pillow insert.
- Follow step-by-step instructions to crochet the waffle pillow, including creating the waffle stitch and assembling the pillow.
- Tips and tricks for perfecting the waffle pillow crochet pattern include using the right tension and blocking the finished pillow.
- Get creative with customizing your waffle pillow by adding tassels, buttons, or using different colors and yarn textures.
Materials Needed for Waffle Pillow Crochet Pattern
Before diving into the world of crochet, it’s essential to gather all the necessary materials to ensure a smooth crafting experience. For this waffle pillow crochet pattern, you will need the following supplies: – Yarn: Choose a medium-weight yarn (worsted weight) in your desired color. Cotton or acrylic blends work well for pillows, providing both durability and comfort.
– Crochet Hook: A size H (5.0 mm) crochet hook is recommended for this project.
This size strikes a balance between creating a tight fabric and allowing for easy maneuverability.
– Scissors: A pair of sharp scissors will be needed to cut your yarn at the end of your project.
– Tapestry Needle: This tool is essential for weaving in loose ends and sewing together the pillow panels.
– Pillow Insert: Depending on the size of your pillow, you will need a pillow insert or stuffing to fill your creation. A standard 16×16 inch pillow insert works well for this pattern. Having these materials on hand will set you up for success as you embark on your waffle pillow crochet journey.
Remember, choosing high-quality yarn can make a significant difference in the final look and feel of your pillow.
Step-by-Step Instructions for Crocheting the Waffle Pillow
Now that you have gathered all your materials, it’s time to get started on your waffle pillow! Follow these step-by-step instructions to create your very own cozy masterpiece.
1. **Foundation Chain**: Begin by making a foundation chain that is a multiple of 3 plus 2. For example, if you want your pillow to be 16 inches wide, chain 50 stitches. This will give you enough width to create a lovely waffle texture. 2. **Row 1**: In the second chain from the hook, make a double crochet (dc). Continue making one dc in each chain across the row. At the end of the row, chain 2 and turn your work.
3.
**Row 2**: For this row, you will start creating the waffle stitch. Begin with a front post double crochet (fpdc) around the first dc from the previous row. Then, make one back post double crochet (bpdc) around the next dc. Alternate between fpdc and bpdc across the row until you reach the end. Finish with a dc in the last stitch. 4. **Row 3**: Chain 2 and turn your work. Repeat the waffle stitch pattern from Row 2 for this row. 5. **Continue Crocheting**: Keep repeating Rows 2 and 3 until your piece measures approximately 16 inches in height or until you reach your desired length. 6. **Finishing Off**: Once you have reached the desired height, fasten off your yarn and weave in any loose ends using your tapestry needle. 7. **Creating the Back Panel**: To create the back panel of your pillow, repeat steps 1-6 using the same foundation chain and stitch pattern. 8.
**Assembling the Pillow**: Place the front and back panels together with the right sides facing each other.
Use a whip stitch or slip stitch to seam around three sides of the pillow, leaving one side open for stuffing. 9. **Stuffing**: Turn the pillow cover right side out and insert your pillow insert or stuffing into the open side until it is filled to your liking. 10. **Closing Up**: Once stuffed, use your tapestry needle to sew up the open side securely. Congratulations! You have successfully created your very own waffle pillow using this free crochet pattern.
Tips and Tricks for Perfecting the Waffle Pillow Crochet Pattern
As with any crochet project, practice makes perfect! Here are some helpful tips and tricks to ensure that your waffle pillow turns out beautifully: – **Tension Matters**: Pay attention to your tension while crocheting. If your stitches are too tight, it may be challenging to work with them later on.
Conversely, if they are too loose, your pillow may not hold its shape well.
– **Count Your Stitches**: Keep track of your stitches as you work through each row. This will help you maintain an even pattern and avoid any mistakes that could disrupt the waffle texture. – **Use Stitch Markers**: If you’re new to crocheting or find it challenging to keep track of where you are in your pattern, consider using stitch markers to mark important points in your work.
– **Practice Makes Perfect**: If you’re unfamiliar with front post double crochet or back post double crochet stitches, take some time to practice them separately before starting on your pillow. This will help build your confidence and ensure that you achieve that lovely waffle texture.
Creative Ways to Customize Your Waffle Pillow
One of the best aspects of crocheting is the ability to personalize your projects! Here are some creative ways to customize your waffle pillow: – **Color Combinations**: Experiment with different color combinations by using multiple yarn colors throughout your project. You can create stripes or even a gradient effect by changing colors every few rows.
– **Add Buttons**: For an extra touch of charm, consider adding buttons to one side of your pillow cover. This not only enhances its visual appeal but also allows for easy removal when washing. – **Borders and Edging**: Adding a decorative border around the edges of your pillow can elevate its overall look.
Consider using a simple single crochet border or a more intricate shell stitch for added flair. – **Size Variations**: Don’t feel limited to just one size! You can easily adjust the foundation chain to create smaller or larger pillows that suit different spaces in your home.
Benefits of Using a Waffle Pillow
Waffle pillows are not just aesthetically pleasing; they also offer several practical benefits that make them an excellent addition to any home décor: – **Comfort**: The plush texture of a waffle stitch pillow provides excellent support for your head and neck when lounging on the couch or bed. It’s perfect for those lazy afternoons spent reading or napping. – **Versatility**: Waffle pillows can be used in various settings—on sofas, beds, chairs, or even as decorative accents on shelves or benches.
Their unique texture adds depth and interest to any space. – **Easy Maintenance**: Most crochet pillows can be easily washed by removing the stuffing or insert and washing just the cover. This makes them practical for everyday use without sacrificing style.
– **Personal Touch**: Handmade items carry a special charm that store-bought products often lack. By creating your own waffle pillow, you add a personal touch to your home that reflects your unique style and creativity.
Maintenance and Care for Your Waffle Pillow
To ensure that your waffle pillow remains beautiful and functional for years to come, proper maintenance is key. Here are some care tips: – **Washing Instructions**: Always check the care label on your yarn before washing. Most acrylic yarns can be machine washed on a gentle cycle; however, cotton yarn may require hand washing to maintain its shape.
– **Drying**: Avoid using high heat when drying your pillow cover; instead, opt for air drying or tumble drying on low heat to prevent shrinkage or damage. – **Regular Fluffing**: To keep your pillow looking fresh and full, remember to fluff it regularly by giving it a good shake or patting it into shape after washing. – **Storage Tips**: If you need to store your waffle pillow for an extended period, keep it in a cool, dry place away from direct sunlight to prevent fading or damage.
Conclusion and Final Thoughts on the Waffle Pillow Crochet Pattern
Creating a waffle pillow is not only an enjoyable crafting experience but also results in a beautiful piece that enhances any living space. With its unique texture and customizable options, this free crochet pattern is perfect for both beginners and seasoned crocheters alike. We hope this guide has inspired you to pick up your hook and yarn and start crafting!
As you embark on this creative journey, remember that every stitch is an opportunity to express yourself and add warmth to your home décor. We encourage you to share your finished creations with friends and family or even on social media platforms—there’s nothing quite like showcasing handmade items that reflect your personal style! Happy crocheting!