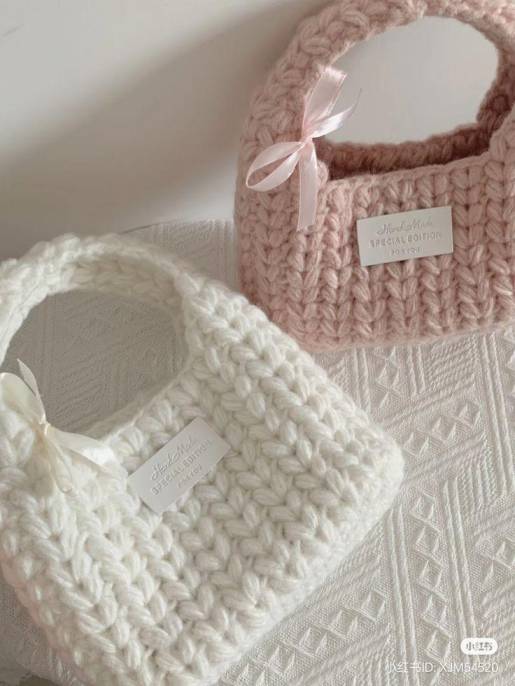
Puffy Mini Crochet Tote Bag (like the one in your photo): a complete build guide for a structured, non-stretch finish
This puffy mini crochet tote style is trending for a reason: it’s cute, soft-looking, and gives a “boutique handbag” vibe without complex shaping. The bag in your photo has a rounded rectangle body, a chunky textured stitch that creates vertical ridges, and a built-in handle, finished with a small ribbon bow and a clean label. The key to making it look good in real life (not only in photos) is controlling stretch and adding structure so it holds its shape when you carry your phone, keys, and wallet.
In this guide, you’ll learn the best yarn choices for a crochet bag that won’t sag, the stitches that create the puffy ribbed look, and the exact build method from base to handle. You’ll also get practical “pro upgrades” like lining and stiffening that make the bag stand up and stay firm over time.
Why This Puffy Mini Crochet Tote Bag Looks Expensive
A crochet tote looks premium when it has clean stitch definition, a stable silhouette, and a handle that doesn’t collapse. Chunky yarn gives bold texture. Tight tension makes the fabric feel like a real bag instead of a soft accessory. A firm top edge prevents the opening from stretching wider over time. Finally, small details like a ribbon bow and minimalist label keep the design cute and polished.
If you crochet the fabric too loose, the bag will stretch quickly—especially around the handle and top corners. That’s why structure matters more than the stitch pattern.
Best Yarn for a Crochet Bag That Holds Its Shape
For a structured mini tote, choose yarn that creates a dense fabric and doesn’t bounce back too much.
Cotton is the safest choice because it forms crisp stitches and holds shape better than many soft acrylics. Cotton blends (cotton/linen, cotton/hemp) also work well and often feel more “bag-like” with less sag. If you want the extra puffy look like your photo, use bulky yarn or hold two strands of worsted yarn together.
Avoid very stretchy or fluffy yarns for the full bag body unless you plan to add a lining and stiffener, because the bag can grow longer with use.
Best Hook Size for a Structured Crochet Tote
For bags, don’t follow the yarn label blindly. Your goal is a tight fabric. If the stitches look airy or the bag feels floppy in your hands, go down one hook size. A good bag fabric should feel firm even before you add lining.
As a simple rule: if you can easily push your finger through gaps, you need tighter tension or a smaller hook.
Crochet Tote Bag Materials Checklist
You’ll need:
- Yarn (cotton or sturdy blend; bulky for extra puff)
- Crochet hook (choose for tight tension)
- Stitch markers
- Tapestry needle
- Scissors
Optional upgrades (recommended for a “real purse” finish):
- Lining fabric (cotton/linen)
- Interfacing or stiffener for the lining
- Magnetic snap or button
- Ribbon for the bow
- Small label/tag
How Big Should a Mini Crochet Tote Bag Be
A mini tote like the one in your photo typically fits:
- Width: 18–22 cm
- Height (body only): 14–18 cm
- Depth: 5–8 cm
- Handle opening height: 8–10 cm
You can scale the size by changing the base rectangle and the number of rounds you crochet for height.
Best Stitch for a Puffy Ribbed Crochet Bag Texture
To recreate the vertical ridges and puffy texture:
- Half double crochet in the back loop creates plush ribs and fast progress
- Single crochet creates a denser, stiffer fabric (less puff, more structure)
- A rib stitch pattern (back loop only) helps the bag keep shape
If you want “puffy + sturdy,” ribbed half double crochet with a slightly smaller hook is the best balance.
How to Crochet a Puffy Mini Tote Bag Step by Step
This bag is built in three parts: base, walls, and handle/top edge. You can crochet it in joined rounds or continuous rounds—just keep your stitch count consistent.
Crochet the Base for a Rounded Rectangle Tote Bag
Start with a chain that matches your desired bag width.
- Make a foundation chain (for a mini size, around 18–22 chains is common, but adjust for your yarn and goal size).
- Single crochet along the chain.
- At the last chain, crochet multiple stitches into the same stitch to turn the corner smoothly.
- Continue single crocheting along the underside of the chain.
- Increase only at the two rounded ends each round to keep a rounded rectangle shape.
Keep working rounds until the base matches your target width and depth.
Tip: If the base ripples, you increased too much. If it curls upward like a bowl, you didn’t increase enough.
Build the Tote Bag Walls So the Sides Stand Up
Once the base is the right size:
- Crochet one full round in the back loop only using single crochet. This creates a sharp “fold line” that forces the bag to turn upward and look structured.
- Crochet the body height using your chosen texture:
- For the photo look: half double crochet in the back loop only (ribbed)
- For maximum structure: single crochet all around
Continue until the body height is around 14–16 cm (or your preferred height).
Strengthen the Top Edge to Prevent Stretching
A strong rim keeps the bag opening neat.
Do one tightening round along the top edge (a slip stitch round works well for firmness), then do one round of single crochet for a clean finish. If your yarn is very thick, one firm round may be enough to avoid bulk.
How to Crochet the Built-In Handle Opening
To create the handle:
- Mark the front center stitches.
- Crochet across the top edge until you reach the start of the handle opening.
- Chain enough stitches to form the opening width (often 10–14 chains for a mini tote; adjust to your size).
- Skip the same number of stitches on the bag rim.
- Continue crocheting around.
On the next rounds, crochet into the chain space (one stitch per chain) to “fill in” the handle bridge. Crochet 2–4 rounds to thicken the handle and make it feel solid. Finish with a tight edging round if you want extra stability.
How to Stop a Crochet Bag Handle From Stretching
Handles stretch because they carry all the weight. To keep the handle firm:
- Crochet the handle section tighter than the body
- Add extra rounds around the handle opening
- Add a firm edging round on the handle
- If you add lining, insert a hidden fabric strip inside the handle area for reinforcement
This is the difference between a cute tote and a usable purse.
Add Lining to a Crochet Tote Bag for a Professional Finish
Lining is the best upgrade for a crochet bag. It prevents items from poking through stitch gaps, reduces sagging, and makes the inside look clean.
Simple lining method:
- Measure the inside width, height, and depth.
- Cut fabric with seam allowance to form a pouch.
- Sew the sides and bottom.
- Insert the lining, fold the top edge inward, and hand stitch it to the crochet rim.
If you want the bag to look truly “store-bought,” lining is the step that makes the biggest difference.
How to Make a Crochet Tote Bag Stand Up
If you want the bag to hold a firm shape like in your photo:
- Add interfacing or a stiffener to the lining pieces before inserting
- Use a stiff base insert (optional) to keep the bottom perfectly flat
Even a light stiffener makes the bag stand up, keeps corners crisp, and stops the body from collapsing.
Easy Crochet Bag Closure Ideas
If you want a closure:
- Magnetic snap in the lining (clean and modern)
- Button + loop (cute and simple)
- Zipper in the lining (most secure)
For a mini tote, a magnetic snap is often the easiest “premium” option.
Finishing Touches for a Cute Aesthetic Tote Bag
To match the look in your photo:
- Tie a satin bow near the handle base and secure it with a few hidden stitches
- Add a small label/tag centered on the front
- Lightly shape the bag before attaching the lining so everything sits symmetrical
Small details make the bag look intentional and high quality.
Crochet Tote Bag Care Tips
To keep the bag looking new:
- Don’t store it hanging with heavy items inside
- Reshape while damp and dry flat if you wash it
- Spot clean if you used stiffeners or interfacing
Crochet bags last longer when you avoid long-term stretching.
Puffy Mini Crochet Tote Bag Troubleshooting
If the bag is floppy:
Use a smaller hook, tighten tension, and add lining (plus stiffener for structure).
If the top edge stretches:
Add a firm rim round and tighten the edge with a denser finish.
If the handle stretches:
Reinforce the handle with extra rounds and tighter stitching, or add a hidden fabric strip.
If the base warps:
Fix your increases—too many causes ripples, too few causes cupping.
Reusable Formula: Make This Crochet Mini Tote in Any Size
Build a rounded rectangle base to your target size, turn the edge upward with a back-loop round, crochet the body in ribbed half double crochet for texture, strengthen the top rim, create the handle opening with chain-and-skip, then thicken the handle with extra rounds. Add lining and optional stiffener for a structured, boutique finish.