Crochet Granny Square Phone Bag: How to Make a Cute Crossbody Phone Pouch With a Flap (Beginner Friendly)
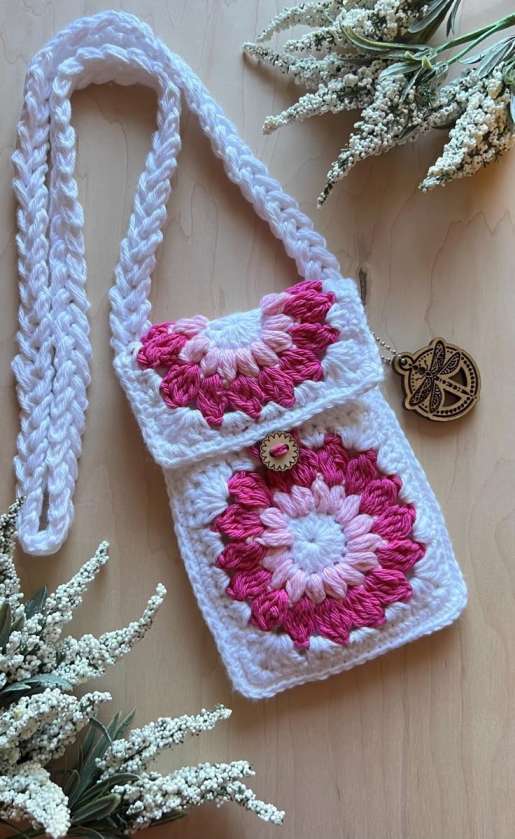
This crochet phone bag style is a Pinterest favorite because it’s small, colorful, and actually useful. The design in your photo is a slim crossbody pouch made from two granny-style flower squares with a clean white border, a flap closure, and a long crocheted strap. It’s perfect for holding a phone, cards, keys, lip balm, or earbuds—without carrying a full handbag.
In this article, you’ll learn exactly what makes this phone pouch look neat and “handmade-but-polished,” the best yarn choices, the stitch options that hold shape, and a full build method you can follow to crochet one from start to finish.
Why a Granny Square Phone Bag Is So Popular
A granny square pouch checks all the boxes:
- Quick project (you can finish it in one weekend)
- Beginner-friendly (repeatable rounds and simple assembly)
- Easy to customize (colors, strap length, button style, flap shape)
- Great gift idea (small, lightweight, and practical)
- Perfect for summer outfits and everyday errands
The flower-style square in your photo adds a “cute aesthetic” touch while the white border keeps it clean and modern.
Best Yarn for a Crochet Phone Pouch That Holds Its Shape
A phone pouch needs structure. If it’s too soft, it will stretch, sag, and lose its shape quickly—especially around the opening and strap.
Best yarn options:
- Cotton yarn: crisp stitches and better shape control
- Cotton blends (cotton/linen or cotton/hemp): even less stretch and more durability
- Acrylic can work for decoration, but it’s usually softer and may stretch more unless you line the bag
If you want the pouch to feel sturdy, choose yarn that makes a dense fabric and avoid super fluffy yarn for the body.
Best Hook Size for a Sturdy Crochet Bag
For small bags, tighter is better. If your stitches look loose and you can see big gaps, your hook is too large.
Simple rule:
- Use the hook size that makes the square feel firm, not floppy
- If the pouch feels soft and stretchy, go down one hook size
A phone bag should feel like a “fabric case,” not a soft scarf.
Crochet Phone Bag Supplies Checklist
Here’s what you’ll need:
- Yarn in 2–3 colors (like white + two pink tones)
- Crochet hook
- Stitch markers (helpful for corners)
- Tapestry needle
- Scissors
- Button (or magnetic snap)
- Optional lining fabric (recommended if you want a premium finish)
What Size Should a Crochet Phone Pouch Be
Most phone pouches work best in this range:
- Width: 10–12 cm
- Height: 16–19 cm (so the phone sits deep enough)
- Flap length: 6–9 cm
- Strap length: 100–120 cm (adjust to your height and preference)
To fit your exact phone, measure:
Phone height + 2 cm for comfort
Phone width + 1–2 cm so it slides in easily
The Flower Granny Square Look (Like the Photo)
The square in your photo looks like a flower granny square:
- A center circle
- Petal-like stitches around the center
- A final round that forms a square shape
- A clean border round (white) to unify the look
You can achieve this style with many “sunburst” or “flower” granny square variations. The exact flower doesn’t matter as much as keeping the final square size consistent for both pieces.
How to Crochet the Squares for Your Phone Bag
Make two matching squares:
- Square 1: front panel
- Square 2: back panel
General method:
- Crochet the flower center in color A
- Add petal rounds in color B (and optional color C)
- Convert the circle into a square using corner stitches
- Add one or two border rounds in white to create a clean frame
Important tip: Both squares must end with the exact same stitch count and size, or your assembly will look uneven.
How to Assemble a Crochet Granny Square Phone Pouch
Once you have two squares:
- Place them right sides facing outward (pretty sides outside)
- Whip stitch or single crochet around the sides and bottom
- Leave the top open
Best seam for a neat look:
- Single crochet join gives a clean edge and adds strength
- Whip stitch is flatter and softer but can stretch more
If you want a more structured edge, use the single crochet join.
How to Add the Flap (Like the Photo)
The pouch in your photo has a flap made from a smaller matching square or a half-square style piece.
Option A: Flap from a third square
- Crochet one smaller flower square
- Attach it to the back panel near the top edge
- Let it fold over the front
Option B: Flap crocheted directly onto the back panel
- Join yarn at the top back edge
- Crochet rows back and forth until the flap reaches the desired length
- Shape it with decreases if you want rounded corners
For the cleanest look, add a white border round around the flap to match the bag.
How to Add a Button Closure
A button closure makes the pouch feel like a real mini bag.
Steps:
- Sew the button to the front panel, centered
- Make a button loop on the flap:
- Chain a small loop
- Attach it securely so it doesn’t stretch out
- Test the closure with your phone inside so it isn’t too tight
If you prefer a more modern closure, you can use a magnetic snap (best added if you line the bag).
How to Crochet the Strap (And Stop It From Stretching)
The strap in your photo is crocheted thick and flat. That’s good because thin straps stretch and dig into the shoulder.
Best strap styles for strength:
- Tight single crochet strap (dense and sturdy)
- Slip stitch strap (firm and neat)
- A flat strap with two rows of single crochet for extra body
For a long strap:
- Crochet a strap strip
- Attach both ends securely to the top sides of the pouch
Anti-stretch tip:
If you want the strap to stay perfect over time, you can sew a thin fabric ribbon or tape inside the strap (hidden) for reinforcement.
How to Make Your Crochet Phone Bag Look “Store-Bought”
If you want that polished finish:
- Add a lining to prevent stretching and stop items from poking through
- Use tight stitches and consistent tension
- Block the squares lightly so edges are straight
- Keep color changes clean and weave in ends neatly
- Add a clean border round (white) to frame the design
Even a simple lining makes a huge difference: the pouch holds shape, the flap sits better, and the closure feels stronger.
Easy Lining Method for a Crochet Phone Pouch
Lining is optional, but highly recommended if the pouch will be used daily.
Simple approach:
- Measure the inside size of your pouch
- Cut fabric slightly bigger with seam allowance
- Sew a small pouch shape
- Insert it and hand stitch it to the top inside edge
If you’re adding a snap or magnetic closure, install it on the lining first, then attach the lining to the crochet pouch.
Cute Customization Ideas for This Phone Bag Style
You can keep the same design but change the vibe easily:
- Pastel palette for “soft aesthetic”
- Neutral tones for minimal fashion
- Bright summer colors for festival vibe
- Add a mini charm or keychain
- Add a tiny pocket inside (for cards)
- Make the flap scalloped for extra cuteness
You can also make matching sets: phone bag + scrunchie + small coin pouch.
Crochet Phone Bag Care Tips
To keep it looking fresh:
- Avoid overloading it (crochet stretches under weight)
- Spot clean when possible
- If washing, reshape while damp and dry flat
- Store flat so the strap doesn’t pull on the pouch
Crochet Granny Square Phone Bag Troubleshooting
If the pouch is too small:
Add one more border round to each square or use slightly thicker yarn.
If the pouch stretches:
Use tighter stitches, add lining, and reinforce the strap.
If the flap doesn’t sit flat:
Block the flap piece lightly and add a border round for structure.
If the button loop stretches:
Make the loop shorter and stitch it down more securely.
Reusable Formula: Make This Phone Pouch in Any Style
Crochet two matching flower granny squares, join the sides and bottom to form a pouch, add a flap (separate piece or worked directly), attach a button closure, and finish with a sturdy strap. Add a white border for a clean aesthetic and a lining for a professional finish.