Tie-Front Crochet Cardigan Pattern: Cropped Lace Cardigan With Long Sleeves
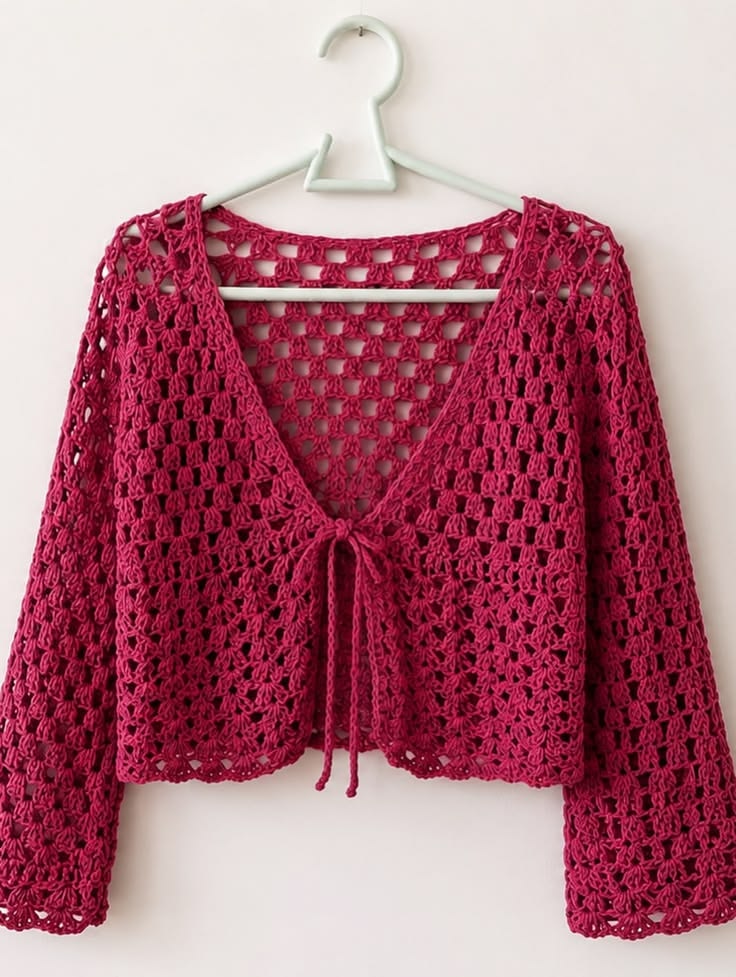
This beautiful crochet piece is best described as a cropped openwork tie-front cardigan, sometimes also called a crochet bolero or lace shrug.
The design combines a deep V neckline, long airy sleeves, a fitted cropped body, a delicate front tie, and an all-over cluster-mesh stitch. The rich raspberry color makes the cardigan especially eye-catching, but the same pattern would also look beautiful in cream, black, sage, chocolate brown, soft pink, or white.
What makes this cardigan particularly attractive is that it looks detailed without requiring extremely complicated shaping. Most of the garment can be created from simple rectangular crochet panels, while the V neckline is shaped gradually near the upper front.
The pattern below is an original reconstruction inspired by the garment in the reference image. A photograph alone cannot reveal the unknown designer’s exact stitch counts or written instructions, so this version recreates the same overall look, proportions, mesh texture, cropped silhouette, long sleeves, scalloped edges, and center-front tie in a practical pattern that can actually be followed.
Pattern Overview
Skill level: Intermediate
Terminology: US crochet terms
Construction: Back panel, two front panels, and two sleeves worked separately and seamed
Fit: Lightly fitted
Length: Cropped, approximately waist length
Neckline: Deep V
Closure: Crochet tie at center front
Sleeves: Long and slightly relaxed
Main stitch: Granny-style cluster mesh
Recommended yarn: Fine #2 or Sport #2
Recommended hook: 3.5 mm
Finished Sizes
The cardigan is intended to be worn with a little positive ease rather than stretched tightly across the body.
| Size | Finished Bust | Approx. Body Bust |
|---|---|---|
| XS | 84 cm / 33″ | 76–81 cm |
| S | 94 cm / 37″ | 84–89 cm |
| M | 104 cm / 41″ | 94–99 cm |
| L | 114 cm / 45″ | 104–109 cm |
| XL | 124 cm / 49″ | 114–119 cm |
| 2XL | 134 cm / 53″ | 124–129 cm |
Because this is an open-front cardigan, the two fronts do not need to close completely across the chest. The tie simply draws the lower part of the neckline together.
Approximate Finished Length
From shoulder to hem:
XS: 43 cm
S: 44 cm
M: 45 cm
L: 46 cm
XL: 47 cm
2XL: 48 cm
You can easily make the cardigan longer by adding more pattern rows before beginning the armhole and neckline shaping.
Materials
You will need approximately:
XS: 700–800 m
S: 800–900 m
M: 900–1,000 m
L: 1,000–1,100 m
XL: 1,100–1,250 m
2XL: 1,250–1,400 m
Also prepare:
- 3.5 mm crochet hook
- Optional 3.0 mm hook for borders
- Stitch markers
- Measuring tape
- Tapestry needle
- Scissors
- Blocking pins
Best Yarn for This Cardigan
Choose a yarn that creates crisp stitches while still having enough drape for the open sleeves.
Excellent choices include:
- Cotton-viscose
- Cotton-bamboo
- Mercerized cotton
- Cotton-acrylic blend
- Soft sport-weight cotton
- Fine microfiber yarn
A smooth yarn is preferable because the open cluster pattern is one of the main features of the cardigan.
Avoid very bulky or fuzzy yarns because they can obscure the mesh texture.
Recommended Color
The reference cardigan uses a beautiful saturated raspberry or dark fuchsia tone.
Similar shades include:
- Raspberry
- Berry pink
- Cranberry
- Magenta
- Wine rose
- Deep coral pink
For a more neutral version, try:
- Ivory
- Black
- Chocolate
- Beige
- Olive
- Sage
- Navy
Gauge
After blocking:
4 cluster repeats = approximately 10 cm
8 pattern rows = approximately 10 cm
The cluster repeat is more important than the exact row gauge because garment length can be adjusted by adding or removing rows.
Make a gauge swatch at least 15 × 15 cm and block it before measuring.
Abbreviations
ch = chain
sc = single crochet
dc = double crochet
sl st = slip stitch
st = stitch
sp = space
rep = repeat
RS = right side
WS = wrong side
Special Stitch: 3-Double-Crochet Cluster
In this pattern, a cluster group means:
3 dc worked into the same space
This creates the small vertical groups visible throughout the cardigan.
It is technically a group rather than a closed cluster, but “cluster” is used here because it is easier to read throughout the pattern.
Main Cluster-Mesh Pattern
The stitch alternates groups of three double crochets with small open chain spaces.
Pattern Row A
Ch 3.
Turn.
Work 2 dc into the first available space.
Then repeat:
ch 1, 3 dc in next space
across.
Pattern Row B
Ch 4.
Turn.
Work:
3 dc in each ch-1 space, ch 1
across.
Finish with dc into the top of the turning chain.
Repeating these two rows creates an airy granny-style grid similar to the texture in the inspiration cardigan.
Approximate Cluster Counts
At gauge, use the following approximate widths.
Back
XS: 17 cluster repeats
S: 19
M: 21
L: 23
XL: 25
2XL: 27
Each Front
XS: 9 cluster repeats
S: 10
M: 11
L: 12
XL: 13
2XL: 14
One full cluster repeat should measure approximately 2.5 cm after blocking.
Step 1: Crochet the Back Foundation
Using the 3.5 mm hook, make a foundation long enough for:
17 (19, 21, 23, 25, 27) cluster repeats
Your blocked foundation should measure approximately:
42 (47, 52, 57, 62, 67) cm
Do not worry if your chain count differs slightly from another crocheter’s. Matching the required width is more important.
Step 2: Establish the Back Mesh
Work the Main Cluster-Mesh Pattern across the foundation.
Continue alternating Pattern Row A and Pattern Row B.
The piece should remain rectangular.
Step 3: Crochet the Back to the Armholes
Continue until the back measures approximately:
27 (28, 29, 30, 31, 32) cm
from the lower edge.
This should place the work approximately at underarm level.
Step 4: Shape the Back Armholes
At the beginning of the next two rows, omit approximately one complete cluster repeat.
This removes one cluster from each side.
For larger sizes L–2XL, you may remove a second partial repeat on each side if necessary for a cleaner armhole curve.
Continue straight in the mesh pattern.
Step 5: Finish the Upper Back
Work until the full back length reaches:
43 (44, 45, 46, 47, 48) cm
Fasten off.
The upper back should remain relatively straight because most of the neckline shaping occurs on the front pieces.
Step 6: Begin the Left Front
Make a foundation for:
9 (10, 11, 12, 13, 14) cluster repeats
Work the Main Cluster-Mesh Pattern exactly as for the back.
Continue until the front measures:
25–27 cm
or approximately 2 cm before the back reaches armhole height.
Step 7: Begin the V-Neck Shaping
The neckline edge is the inner front edge.
To create the deep V, gradually remove cluster repeats from this edge.
On the next RS row, work across until one full cluster remains near the neckline edge.
Do not work that final cluster.
Turn.
Work the next row normally.
Repeat this decrease approximately every second RS row.
Continue until the shoulder area contains approximately:
4 (4, 5, 5, 6, 6) cluster repeats
The decrease should form a smooth diagonal line.
Step 8: Shape the Front Armhole
When the front reaches the same underarm height as the back, omit one cluster repeat at the outer edge.
The inner edge continues the V-neck shaping.
The outer edge becomes the armhole.
Continue until the front reaches the same total length as the back.
Fasten off.
Step 9: Make the Right Front
Work the second front exactly like the first, reversing all shaping.
The two fronts should mirror one another.
Before continuing, lay them side by side.
Check that:
- both pieces have equal length
- both V edges have the same angle
- shoulder widths match
- armholes begin at the same height
Step 10: Join the Shoulder Seams
Place the front pieces over the back with right sides facing each other.
Align the shoulders.
Using matching yarn and a tapestry needle, sew each front shoulder to the corresponding back shoulder.
A mattress stitch or whip stitch works well.
Do not sew across the neckline opening.
Step 11: Join the Side Seams
Lay the cardigan flat.
Match the lower front edges with the lower back.
Sew from the hem upward toward the armhole.
Stop when you reach the armhole shaping.
Repeat on the second side.
You now have the basic cardigan body.
Step 12: Measure the Armhole
Measure around the entire armhole opening.
This measurement determines the starting width of the sleeve.
The sleeve should fit into the armhole without excessive gathering.
Step 13: Begin the Sleeve
Make a foundation measuring approximately:
34 (36, 38, 40, 42, 44) cm
This is the upper-arm width.
Work the same Main Cluster-Mesh Pattern.
Unlike many fitted sweater sleeves, the sleeves in the reference cardigan are relatively straight and relaxed.
Step 14: Crochet the Upper Sleeve
Continue straight for approximately:
20–22 cm
depending on arm length.
Try the width against the upper arm.
It should have enough room to drape without feeling tight.
Step 15: Taper Toward the Wrist
To create a subtle taper, decrease one cluster repeat at each side approximately every:
7–9 rows
until the sleeve reaches a comfortable wrist width.
A finished lower-sleeve circumference of approximately:
20–24 cm
works well for most sizes.
Do not make the wrist extremely narrow because the reference sleeve has a relaxed, slightly flared appearance.
Step 16: Crochet the Full Sleeve Length
Continue until the sleeve measures approximately:
48 (49, 50, 51, 52, 53) cm
from underarm to wrist.
If you have long or short arms, adjust this measurement.
The image shows sleeves reaching slightly beyond the wrist, so adding 1–2 cm can create the same soft effect.
Step 17: Make the Second Sleeve
Repeat exactly.
Count the rows rather than relying only on measurements.
Both sleeves should contain the same:
- number of rows
- decrease positions
- cluster count
- finished length
Step 18: Seam the Sleeves
Fold each sleeve lengthwise with right sides facing.
Sew from the wrist to the upper edge.
Turn the sleeve right side out.
Repeat with the second sleeve.
Step 19: Attach the Sleeves
Turn the cardigan inside out.
Insert one sleeve into an armhole with right sides together.
Align:
- sleeve seam with side seam
- sleeve center with shoulder seam
Pin or mark at four evenly spaced points.
Sew the sleeve into the armhole.
Avoid stretching either piece excessively.
Repeat for the second sleeve.
Step 20: Crochet the Front and Neckline Border
Using the 3.0 or 3.5 mm hook, join yarn at the lower corner of one front.
Work sc evenly:
up the first front edge,
around the V neckline,
across the back neck,
down the opposite front.
Try to keep the border flat.
If the border ripples, you have too many stitches.
If it pulls inward, add slightly more stitches.
Step 21: Add a Second Border Row
Ch 1.
Turn.
Sc in each stitch along the entire border.
For a more decorative finish, you can instead use:
sc, ch 2, skip one stitch
along the edge.
The reference cardigan has a delicate handmade edge rather than a thick band, so avoid adding too many rows.
Step 22: Make the First Front Tie
Join yarn at the point where the V neckline meets the bust area.
Chain approximately:
45–55 cm
depending on how long you want the tie.
Turn.
Sl st loosely back through every chain.
Fasten off.
This creates a thin but sturdy crochet cord.
Step 23: Make the Second Tie
Repeat on the opposite front at exactly the same height.
Tie the two cords into a small bow.
The finished ties should fall roughly 15–20 cm below the knot, similar to the inspiration cardigan.
Step 24: Create a More Decorative Tie
If you want a slightly thicker cord, use this method instead.
Ch the required length.
Starting in the second chain from the hook, sc in every chain.
Fasten off.
This produces a flatter tie.
For an even more polished finish, use Romanian crochet cord.
Step 25: Add the Bottom Border
Join yarn at one side seam.
Work one round of sc around the entire lower edge.
For a simple finish, stop here.
For the subtle scallop seen in the inspiration, continue with another round.
Step 26: Crochet a Small Scalloped Hem
Repeat around:
sc in next stitch, skip one stitch, 5 dc in next stitch, skip one stitch
Continue evenly.
If five double crochets produce too large a shell for your yarn, use three double crochets instead.
The scallops should remain small and delicate.
Step 27: Add Matching Sleeve Edges
Work the same edging around both cuffs.
This visually connects the sleeves to the lower cardigan border.
Keep the edging loose enough that the cuff does not become tight.
Step 28: Optional Decorative Neck Edge
If you want the neckline to look even more delicate, add tiny picots.
Repeat:
sc in next 3 stitches, ch 3, sl st into first ch
around the neckline.
Do not add this to the ties.
Step 29: Weave In All Ends
Use a tapestry needle to secure every yarn tail.
Pay particular attention to:
- shoulders
- underarms
- sleeve seams
- tie attachment points
- lower corners
Weave each end through several stitches before trimming.
Step 30: Block the Cardigan
Blocking is especially important for open crochet.
Wash or wet the cardigan according to the yarn manufacturer’s instructions.
Press out excess water gently.
Do not wring.
Lay flat.
Shape the cardigan to the finished measurements.
Straighten the V neckline.
Match both sleeves.
Open the mesh spaces evenly.
Shape the scalloped borders individually.
Allow the cardigan to dry completely.
How the Cardigan Should Fit
The shoulders should sit close to the natural shoulder line.
The V neckline should fall to approximately the lower bust.
The center tie should sit around the bust or upper waist.
The lower edge should finish around the natural waist.
The sleeves should be loose enough to show the openwork clearly without appearing oversized.
How to Make It More Cropped
Remove several mesh rows before reaching the armhole section.
Keep the armhole shaping and upper-body measurements unchanged.
A finished length around 38–40 cm creates a true bolero-style cardigan.
How to Make It Longer
Add rows to the lower body before beginning the armhole.
For a cardigan finishing at the high hip, add approximately:
8–12 cm
to both front panels and the back.
Do not alter the V-neck shaping unless you also want the neckline lower.
How to Make the V Neck Less Deep
Begin the neckline decreases later.
Instead of starting around 25–27 cm from the hem, begin approximately:
29–31 cm
from the lower edge.
The resulting neckline will sit higher across the chest.
How to Make the V Neck Deeper
Begin the neckline decreases several rows earlier.
Be careful not to make the shoulder section too narrow.
Maintain at least the recommended number of shoulder clusters for your size.
How to Make the Sleeves Wider
Add one or two cluster repeats to the sleeve foundation.
Reduce less frequently toward the wrist.
For a true bell sleeve, do not decrease at all.
You can even add one cluster repeat near each side during the final 15 cm.
How to Make the Sleeves More Fitted
Begin with the same upper-arm measurement.
Decrease more frequently, approximately every 5–6 rows.
Stop decreasing once the lower arm reaches your preferred width.
How to Make a Short-Sleeve Version
Crochet the sleeves only approximately:
12–15 cm
after the armhole.
Finish with the same scalloped edging.
This turns the cardigan into a lightweight summer bolero.
How to Make a Sleeveless Version
Omit the sleeves completely.
Work one or two rounds of sc around each armhole.
This creates a lightweight crochet vest that works beautifully over dresses and camisoles.
Should You Wear Something Underneath?
Because the stitch is intentionally open, the cardigan works best over:
- Camisoles
- Bralettes
- Tank tops
- Dresses
- Swimsuits
- Simple fitted tops
A matching camisole creates a more polished outfit, while contrasting colors emphasize the crochet pattern.
Best Styling Ideas
For a romantic look, wear the raspberry cardigan with a white camisole and high-waisted cream trousers.
For a casual summer outfit, pair it with denim and a simple tank top.
For festival or beach styling, wear it over a bralette or swimsuit.
A cream version would look beautiful over floral dresses.
A black version could easily become an evening layering piece.
Why the Tie-Front Design Works
A traditional button band would add significant visual weight to this delicate lace cardigan.
The narrow ties preserve the open, airy look.
They also allow the wearer to adjust how closely the cardigan sits against the body.
Untied, it becomes a completely open layering piece.
Tied loosely, the fronts fall naturally.
Tied more firmly, the shape becomes closer to a cropped fitted top.
Why This Pattern Is Pinterest-Friendly
This type of crochet cardigan performs particularly well visually because it combines several features people search for:
- Crochet top
- Crochet cardigan
- Tie-front cardigan
- Mesh crochet
- Crochet bolero
- Long-sleeve crochet
- Summer crochet outfit
- Handmade fashion
The rich color also stands out strongly against light Pinterest backgrounds.
Common Problem: My Mesh Is Too Loose
Move down one hook size.
Do not pull the stitches extremely tight.
The goal is to make the cluster groups slightly smaller while preserving the open chain spaces.
Common Problem: My Mesh Is Too Dense
Try a 4.0 mm hook.
You can also increase the ch-1 gaps to ch-2, although this will make the fabric considerably more open.
Always make another gauge swatch before modifying the entire garment.
Common Problem: The V Neck Is Uneven
Count your decrease rows carefully.
Both front panels need to lose clusters at exactly the same rate.
Writing down the row numbers of each decrease while making the first panel makes the second front much easier.
Common Problem: The Front Corners Curl
This often happens before blocking.
First block the cardigan.
If curling remains, add one additional row of sc around the front and neckline border.
Common Problem: The Sleeves Are Too Long After Blocking
Cotton and viscose yarns can grow vertically.
Always measure the blocked gauge swatch before deciding the sleeve length.
If your yarn grows significantly, crochet the sleeve approximately 2–3 cm shorter than the desired finished length.
Common Problem: The Shoulder Seam Stretches
Open lace can stretch under its own weight.
When sewing the shoulder seam, use firm stitches.
You can also crochet one row of slip stitches along the inside of the shoulder seam to stabilize it.
Common Problem: The Tie Pulls on the Front
Attach the tie through several stitches rather than only one mesh loop.
This distributes tension over a wider area.
You can also reinforce the inside with a few invisible sewing stitches.
Care Instructions
Always follow the yarn manufacturer’s label.
For most cotton-based versions:
Wash gently in cool water.
Do not wring.
Reshape while damp.
Dry flat.
Store folded rather than hanging for long periods.
Because the cardigan is made from open lace, hanging it continuously can gradually lengthen the shoulders and sleeves.
Final Thoughts
This raspberry crochet cardigan is a beautiful example of how a relatively simple openwork stitch can create a garment that looks delicate and sophisticated.
The design succeeds because several details work together: the deep V neckline keeps the front light, the cropped hem emphasizes the waist, the long mesh sleeves balance the short body, and the small front bow adds just enough structure without interrupting the lace pattern.
It is also an extremely adaptable crochet project.
Once you understand the basic construction, you can make it shorter, longer, sleeveless, short-sleeved, oversized, or more fitted without completely changing the pattern.
For anyone looking for a feminine crochet layering piece that works with dresses, jeans, skirts, swimwear, and summer outfits, this tie-front cardigan is an excellent project to save.