Crochet Web-Lace Yoke Top Pattern: Elegant Long-Sleeve Crochet Blouse
There is something especially beautiful about crochet clothing that combines solid fabric with open lace.
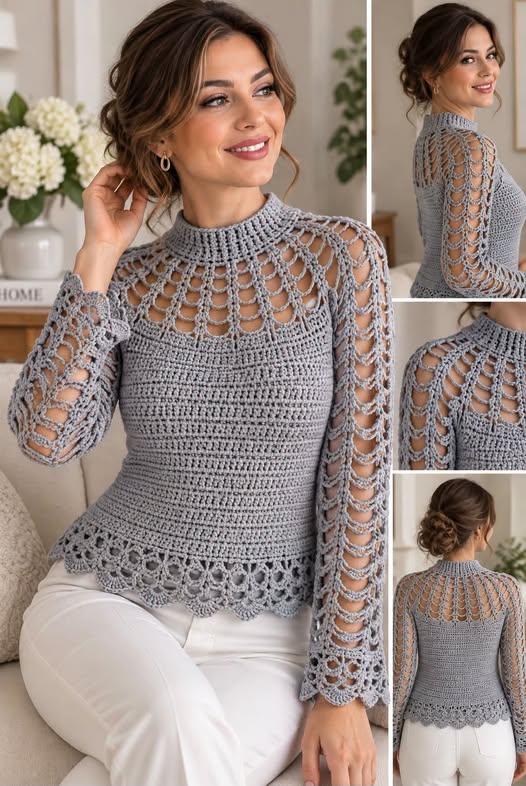
This elegant grey crochet top uses a fitted solid bodice together with a dramatic web-style yoke that spreads outward from a ribbed mock neck. The same lace continues down the sleeves, while a decorative scalloped border gives the bottom edge a soft, feminine finish.
At first glance, the top looks extremely complicated. The construction is actually logical once it is separated into four parts:
- Ribbed neckline
- Expanding circular lace yoke
- Fitted solid crochet body
- Tapered openwork sleeves and lace edging
This pattern is worked mainly from the top down, which makes it easier to test the fit before completing the body.
Pattern note: This is an original crochet pattern reconstructed from the visual characteristics of the inspiration garment. It is not presented as the unknown designer’s original written pattern.
Crochet Top at a Glance
Skill level: Intermediate
Construction: Top-down seamless yoke
Terminology: US crochet terms
Fit: Close fitting / body skimming
Sleeves: Full length
Neck: Ribbed mock neck
Recommended yarn: Sport/Fine Weight #2
Main hook: 3.5 mm
Collar hook: 3.0 mm
The Craft Yarn Council recommends choosing garments from actual bust measurements and then accounting for the amount of ease desired. This design is intended to sit fairly close to the body rather than having the 5–10 cm of positive ease normally used for a classic loose sweater. Craft Yarn Council
Finished Sizes
| Size | Finished Bust | Approx. Body Bust Range |
|---|---|---|
| XS | 78 cm / 30.7″ | 71–76 cm |
| S | 88 cm / 34.6″ | 81–86 cm |
| M | 98 cm / 38.6″ | 91.5–96.5 cm |
| L | 108 cm / 42.5″ | 101.5–106.5 cm |
| XL | 118 cm / 46.5″ | 111.5–117 cm |
| 2XL | 128 cm / 50.4″ | approx. 122–127 cm |
For the appearance in the inspiration photo, choose a finished size close to the wearer’s actual bust rather than adding a lot of ease.
Materials
You will need:
- 900 (1000, 1125, 1250, 1400, 1550) metres sport-weight yarn
- 3.0 mm crochet hook
- 3.5 mm crochet hook
- Stitch markers
- Tapestry needle
- Scissors
- Measuring tape
- Blocking mats and pins if available
A little extra yarn is recommended if you want to lengthen either the body or the sleeves.
Best Yarn for This Top
Look for a yarn with both drape and clear stitch definition.
Good choices include:
- Cotton/bamboo
- Cotton/viscose
- Mercerized cotton
- Soft cotton/acrylic
- Fine microfiber blend
A very fuzzy yarn will hide the lace pattern, so avoid heavy halo yarns.
The grey used in the inspiration works beautifully, but this design would also suit:
- Ivory
- Black
- Dusty rose
- Sage green
- Burgundy
- Navy
- Soft beige
Gauge
Make and block a swatch before beginning.
Solid body gauge
With 3.5 mm hook:
20 dc × 11 rows = 10 × 10 cm
The stitch counts used for the fitted body are calculated around this gauge.
If you obtain more than 20 stitches per 10 cm, try a larger hook.
If you obtain fewer, try a smaller hook.
Garment sizing depends much more on your finished gauge than on the hook number printed on the yarn label.
Crochet Abbreviations
This pattern uses standard US crochet terminology consistent with the Craft Yarn Council abbreviation system. Craft Yarn Council
| Abbreviation | Meaning |
|---|---|
| ch | chain |
| sc | single crochet |
| dc | double crochet |
| tr | treble crochet |
| sl st | slip stitch |
| st / sts | stitch / stitches |
| sp | space |
| rnd | round |
| yo | yarn over |
| FPdc | front-post double crochet |
| BPdc | back-post double crochet |
| dc2tog | double crochet two together |
Special Stitches
Web V-Stitch
Work:
(tr, ch 1, tr)
into the same stitch or ch-1 space.
This creates one of the strong vertical spokes that runs from the neckline toward the shoulder and down the sleeves.
Picot
Ch 3, sl st into the first ch.
The picot is used in the decorative border.
Before You Begin
The lace portion stretches substantially more than the solid double-crochet fabric.
For that reason, three measurements are more important than blindly following a fixed number of rounds:
Yoke depth: The lower edge of the yoke should reach the underarm.
Bust circumference: The solid body should match the desired finished bust.
Sleeve length: Crochet until approximately 3–4 cm before the desired finished wrist length, then add the cuff.
Standard women’s underarm-to-wrist measurements are roughly 42–44.5 cm through the common XS–XL range, but individual adjustment is preferable. Craft Yarn Council
Step 1: Crochet the Ribbed Mock Neck
Use the 3.0 mm hook.
Chain:
78 (84, 90, 96, 102, 108)
Join with a sl st, being careful not to twist the chain.
Round 1
Ch 2.
Dc in each chain around.
Join with sl st.
Stitch count:
78 (84, 90, 96, 102, 108) dc
Round 2
Ch 2.
FPdc around next dc, BPdc around next dc.
Repeat around.
Join.
Rounds 3–5
Repeat Round 2.
The collar should measure approximately 4–5 cm high.
Try the neckline over the head before continuing.
It should stretch over the head comfortably while sitting fairly close to the neck.
mock neckline with open crochet lace beginning below it.
Step 2: Establish the Lace Yoke
Change to the 3.5 mm hook.
The starting stitch count divides into groups of three.
Yoke Round 1
Repeat:
Web V in next stitch, ch 3, skip 2 stitches
around.
You will have:
26 (28, 30, 32, 34, 36) Web V repeats.
Join.
You now have the foundation for the radial lace pattern.
Step 3: Open the Lace Gradually
Every Web V from now on is worked into the ch-1 space in the center of the Web V below.
Round 2
Work:
Web V, ch 4
around.
Round 3
Work:
Web V, ch 5
around.
Round 4
Work:
Web V, ch 6
around.
Round 5
Work:
Web V, ch 7
around.
Round 6
Work:
Web V, ch 8
around.
The chains becoming progressively longer cause the yoke to expand outward without needing to add dozens of new vertical spokes.
This creates the radiating spider-web appearance.
Step 4: Add the Remaining Yoke Depth
Continue working:
Web V in each Web V, ch 8 between Web Vs.
Continue until the lace measures approximately from the lower edge of the collar:
- XS: 15.5–16.5 cm
- S: 16.5–17.5 cm
- M: 17.5–19 cm
- L: 19–20.5 cm
- XL: 20.5–21.5 cm
- 2XL: adjust to wearer
These dimensions correspond broadly to standard women’s armhole-depth ranges and are therefore more reliable than using an arbitrary number of rows for every body size. Craft Yarn Council
ked around a ribbed circular neckline.
Step 5: Divide the Yoke
Lay the work flat.
Place stitch markers to divide the lace repeats into:
| Size | Back | Sleeve | Front | Sleeve |
|---|---|---|---|---|
| XS | 8 | 5 | 8 | 5 |
| S | 8 | 6 | 8 | 6 |
| M | 9 | 6 | 9 | 6 |
| L | 9 | 7 | 9 | 7 |
| XL | 10 | 7 | 10 | 7 |
| 2XL | 10 | 8 | 10 | 8 |
Check that the markers sit approximately beneath the arms.
Do not worry if the exact center of a lace arch shifts slightly.
Step 6: Convert the Lace Into the Solid Body
Now the front and back will become solid crochet while the lace sleeve sections are left unworked.
Starting at the beginning of the back section, distribute double crochets evenly across the lower edge of the back lace until you have:
70 (78, 86, 94, 102, 110) dc
Do not cram the stitches into one part of the arch. Spread them evenly across the chains and V-stitches.
Now chain:
8 (10, 12, 14, 16, 18)
for the first underarm.
Skip the first sleeve section.
Work evenly across the front section until you have:
70 (78, 86, 94, 102, 110) dc
Chain again:
8 (10, 12, 14, 16, 18)
Skip the second sleeve.
Join to the beginning of the back.
Step 7: Complete the First Solid Body Round
On the next round:
Dc in every existing dc.
Work one dc into every underarm chain.
Total:
156 (176, 196, 216, 236, 256) dc
At the stated gauge, this produces finished bust circumferences of approximately:
78 (88, 98, 108, 118, 128) cm
This is an important checkpoint.
Try the top on now.
The fabric should sit close to the bust without severely stretching the dc stitches horizontally.
If you need 2–4 cm more room, add stitches evenly in the two underarm areas rather than altering the lace yoke.
Step 8: Crochet the Upper Torso
Ch 2.
Dc in every stitch around.
Join.
The beginning ch-2 does not count as a stitch.
Continue working even until the solid body measures approximately:
7–8 cm below the underarm.
Step 9: Shape the Waist
Place one marker at each side.
We will decrease four stitches on each shaping round.
Decrease Round
Work until one stitch remains before the first side marker.
Dc2tog across the next two stitches.
Continue to the second side.
Dc2tog across the stitch before and stitch after the marker.
Repeat the same shaping on the opposite side so that 4 stitches total are removed.
Work 3 rounds even.
Repeat the decrease round:
2 (2, 3, 3, 4, 4) times total.
The amount of shaping is intentionally moderate.
This gives a fitted silhouette without turning the pattern into a corset-style garment.
Step 10: Crochet the Waist
After completing the decreases:
Work approximately 4 rounds even.
Try the top on.
The narrowest part should fall around the natural waist.
If your torso is longer, simply add more even rounds before beginning the increases.
Step 11: Shape Toward the Hip
At the same four shaping points used for the decreases, work:
2 dc in one stitch
four times around.
Work three rounds even.
Repeat this increase round the same number of times as the waist decreases.
You should now be back at approximately your original body stitch count.
Step 12: Finish the Body Length
Continue working even in dc until the solid body reaches approximately the upper hip.
For a similar proportion to the photographed top, aim for roughly:
27–31 cm from underarm to the beginning of the lace border.
Try it on before beginning the edging.
Remember that the decorative border will add several additional centimetres.
Step 13: Crochet the Lower Lace Transition
Border Round 1
Repeat:
Sc in next stitch, ch 5, skip 3 stitches
around.
If the final repeat does not land perfectly because of personal alterations, adjust the last one or two skipped stitches discreetly at a side seam.
Join.
Border Round 2
Into every ch-5 space:
Sc, ch 7
Repeat around.
Border Round 3
Into each ch-7 space:
Sc, ch 7
Repeat around.
The border will now hang below the fitted body.
Step 14: Crochet the Scalloped Hem
In every ch-7 space work:
sc, ch 3, 3 dc, picot, 3 dc, ch 3, sc
Repeat around.
Join.
Fasten off.
The finished edge should form soft decorative points rather than a perfectly straight hem.
Step 15: Begin the First Sleeve
Turn the garment so the underarm is accessible.
Join the yarn approximately at the center of the underarm.
The original sleeve Web V sections are still waiting above.
Work evenly across the underarm chains and create approximately two additional Web V sections in this area.
Then continue around the existing sleeve Web V sections.
Work:
Web V in each V, ch 8 between Vs
around.
Join.
Your exact number of Web V repeats is less important here than having:
- no underarm hole
- comfortable upper-arm circumference
- an even lace rhythm
Step 16: Crochet the Openwork Upper Sleeve
Continue:
Web V in each V, ch 8 between Vs
for several rounds.
The vertical Web V stitches should stack over one another.
This gives the sleeve the long open vertical lines seen in the inspiration.
Try the sleeve over the upper arm.
The fabric should hang lightly rather than stretch tightly.
Step 17: Taper the Sleeve
The photographed sleeve gradually narrows from the upper arm to the wrist.
Instead of removing entire lace columns too quickly, taper mainly by reducing the chains between them.
After several rounds at ch 8, change to:
ch 7
between Web Vs.
Continue for approximately 4–5 rounds.
Then change to:
ch 6
Continue another 4–5 rounds.
Progress gradually through:
ch 5 → ch 4 → ch 3 → ch 2
as needed.
Try the sleeve on regularly.
Stop decreasing if it becomes too narrow around the forearm.
Continue until the sleeve finishes approximately 3–4 cm above the desired wrist point.
Step 18: Crochet the Decorative Cuff
Cuff Round 1
Work:
sc in each Web V ch-1 space, ch 4
around.
Cuff Round 2
Work:
sc in each ch-4 space, ch 5
around.
Final Cuff Round
In every ch-5 space work:
sc, 3 dc, picot, 3 dc, sc
around.
Fasten off.
Step 19: Crochet the Second Sleeve
Repeat exactly the same instructions.
To make both sleeves match, record:
- Total number of rounds at ch 8
- Total rounds at ch 7
- Total rounds at ch 6
- Etc.
Do not simply measure one finished sleeve against an unstretched second sleeve because lace can temporarily stretch during handling.
Count the rounds as well.
Step 20: Weave In the Ends
Use a tapestry needle.
Weave tails through several stitches in one direction and then back through nearby stitches.
Pay particular attention to:
- Underarm joins
- Beginning of sleeves
- Collar join
- Final hem join
These areas receive more tension than decorative lace sections.
Step 21: Block the Top
Do not skip blocking.
The openwork will look considerably more refined afterward.
Follow your yarn manufacturer’s washing instructions.
For a washable cotton or bamboo blend:
- Wet the top gently.
- Press out water without wringing.
- Roll it inside a towel.
- Lay flat.
- Straighten the center front and back.
- Open the yoke arches evenly.
- Match both sleeves.
- Shape every scallop.
- Allow it to dry completely.
Do not aggressively stretch the bust unless you intentionally need additional width.
How to Customize the Fit
One major advantage of a top-down construction is that several measurements can be changed without redesigning the entire garment.
For a longer torso
Add extra dc rounds before the lower lace border.
For a cropped version
Begin the border several centimetres earlier.
For a looser waist
Skip some or all waist decreases.
For a tighter waist
Add one additional shaping round, but try the top on first.
For wider upper arms
Work extra stitches into the underarm area when beginning the sleeve.
For shorter sleeves
Begin the cuff whenever the sleeve reaches approximately 3–4 cm above the wrist.
Common Problems and How to Fix Them
My neckline is too tight
Undo the collar before proceeding.
Increase the starting chain in multiples of 6.
The neck must comfortably pass over the head.
The yoke is too short
Do not divide for the sleeves yet.
Continue additional rounds using:
Web V, ch 8
until the bottom of the yoke reaches the underarm comfortably.
Armhole depth varies substantially between bodies, which is why standard sizing guides recommend measuring the wearer rather than relying only on a letter size. Craft Yarn Council
The yoke ripples badly
Your chains may be expanding too quickly.
Instead of changing from ch 5 directly to ch 6 or ch 7, repeat the previous chain length for another round.
The yoke pulls upward
You probably need more yoke depth.
Add one or two additional rounds before separating the sleeves.
The body is too tight
Increase at the underarms.
Adding stitches there is less visible than changing stitch counts across the chest.
The body is too loose
Remove stitches evenly at the underarms during the first solid round.
The sleeve looks too wide
Shorten the chains between the Web V columns gradually.
Do not suddenly eliminate multiple V columns because that can create a noticeable diagonal break in the lace.
Why This Crochet Construction Works
The striking appearance comes from contrast.
The ribbed collar gives structure around the neck.
The treble-crochet Web V columns create strong radial lines over the shoulders.
Increasing the chain spaces allows those columns to spread naturally as the circumference of the yoke becomes larger.
The solid double-crochet torso provides coverage and enough structure to shape the waist.
Continuing the web lace down the sleeves keeps the top visually light, while the decorative border balances the sleeve lace at the bottom of the garment.
Finished Garment Measurements to Check
Before calling the project finished, lay it flat and check:
- Collar is centered
- Front and back are symmetrical
- Both sleeves are the same length
- Both cuffs have equal repeats
- Underarms contain no holes
- Waist shaping occurs at the same height on both sides
- Hem sits level before the decorative scallops
- Scallops are evenly blocked
Care Instructions
Always follow the care instructions on your yarn label.
For most cotton or cotton-blend crochet garments:
- Wash gently
- Avoid aggressive wringing
- Reshape while damp
- Dry flat
- Store folded rather than hanging for long periods
Hanging a lace garment permanently can allow gravity to lengthen the yoke and sleeves.